
You’re meticulous when it comes to construction inspections— very, very meticulous.
After all, years of experience have taught you that small things can snowball into big problems- possibly even a $16,550 OSHA fine- if your inspection records don’t hold up.
So when you spotted a hairline crack in a header, you jotted it down quickly (and even underlined it with a marker). But then…the clipboard rode to another jobsite in the back of a truck. Three weeks later, the drywall crew closed up the wall.
And now you’re so mad at yourself, you could smack your forehead with a block of tofu.
If only you could turn back time and spend five minutes typing those notes into your computer.
Construction inspections are supposed to catch problems before they get worse.
But what’s the point if the inspection notes never make it back to the office?
Or let’s say, they do, but the people who are supposed to act on them never even see them?
The solution?
A reliable, easy-to-follow, digital inspection workflow.
The goal of going digital isn’t just to swap paper for a digital form. It’s to create a reliable process from field entry to verified closeout, so nobody has to guess whether a problem was actually handled.
With everything in one connected system, field teams can submit inspection results straight from the jobsite, while project teams can see what’s been fixed and what still needs attention.
In this article, we’ll walk you through building a digital inspection workflow that tracks every finding through to verified closeout.
6 Steps to a Digital Inspection Workflow: From Field Entry to Verified Closeout
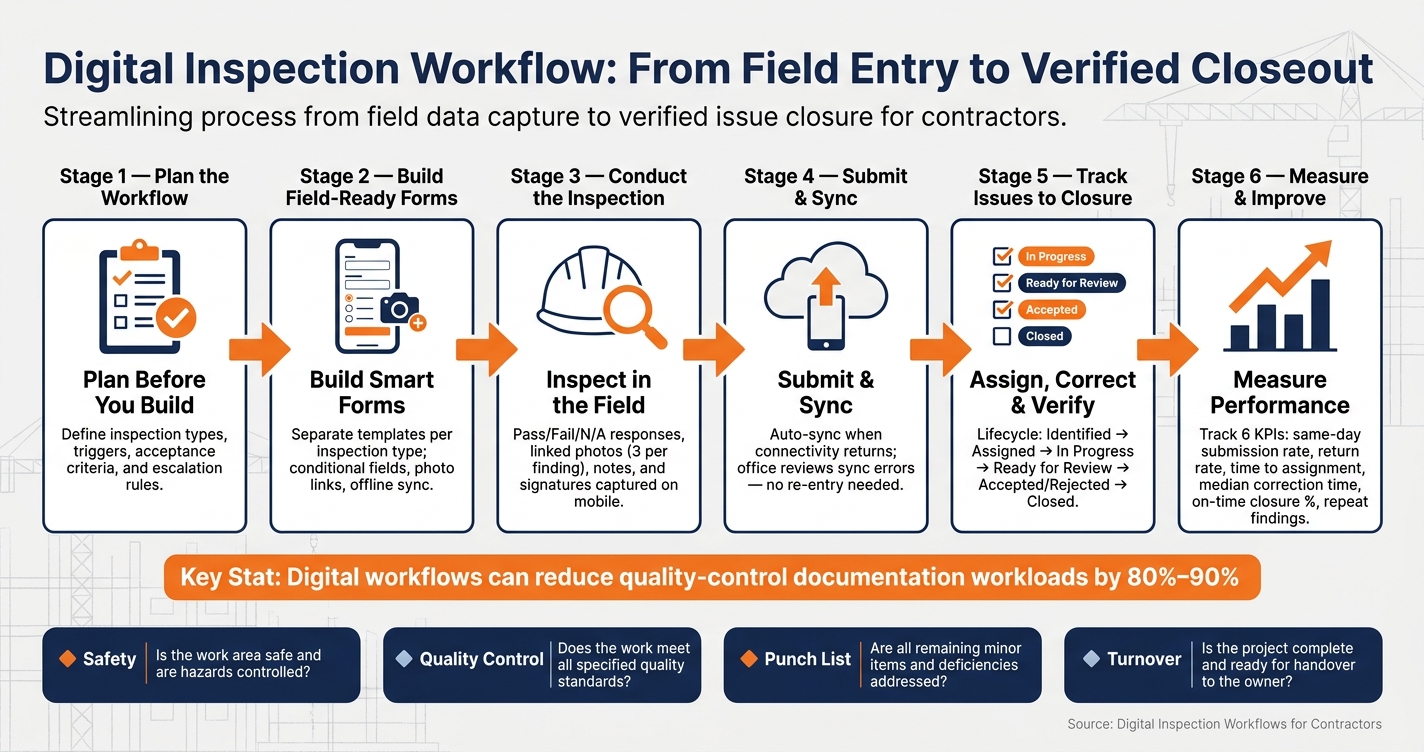
Digital Inspection Workflow: From Field Entry to Verified Closeout
Step 1: Plan the workflow before building forms
After the inspection record is defined, the next step is the workflow that creates it, reviews it, and closes it. That workflow should be set before any form is built. When the workflow is clear first, each inspection collects only the information needed to drive a decision or corrective action.
Separate inspection types by purpose
Each inspection type serves a different function. It answers a different operational question, determines what field personnel can record on mobile devices, and sets the review requirement for office staff. A single generic checklist used for every inspection usually produces uneven records and inconsistent follow-up.
| Inspection type | Primary question | Typical required evidence | Approval path |
|---|---|---|---|
| Safety | Is the work area safe, and are hazards controlled? | Hazard description, severity, photo, corrective action | Foreperson or competent person → safety manager / project manager |
| Quality control | Does installed work meet plans and specifications? | Measurement, test result, photo, drawing or specification reference | Superintendent / QC inspector → project manager or design authority |
| Punch list | What remains incomplete or defective? | Exact location, item description, photo, due date | Superintendent → responsible trade → verifier |
| Turnover | Is the work ready for owner use and record handoff? | Test reports, warranties, manuals, signatures, exceptions | Project manager / QC → owner or design team |
Three items should be defined for each inspection type:
- the inspection trigger
- the acceptance criteria
- the escalation rules
A concrete placement inspection, for example, requires pre-pour evidence. That evidence does not belong on a safety walk form.
Assign responsibilities from foreperson to office staff
Responsibility should be assigned by action, not only by title, for each inspection type before rollout. In practice, the foreperson or field supervisor completes daily inspections, pre-task checks, and immediate safety reviews, then submits the record from the field. The superintendent, quality manager, or safety manager reviews the submission, confirms that the inspection is complete, and escalates serious findings. The project manager addresses schedule, cost, design, or owner-impact issues. The subcontractor or trade lead corrects assigned deficiencies and uploads proof of completion. A designated verifier, often the superintendent, quality manager, or a competent person, then confirms independently that the correction is complete and effective. Office staff handle final record control, distribution, retention, and reporting.
The verifier role matters. Closure should not rely on a verbal update alone. Construction quality procedures commonly require the responsible subcontractor to correct a punch-list item, followed by reinspection and final validation. Keeping the person who identified the issue separate from the person authorized to close it creates an audit trail that can withstand owner or regulatory review.
Set fixed status rules for consistent reporting
Status labels need written definitions. Short, specific definitions remove the ambiguity that leads office staff to follow up with field supervisors for clarification.
A dependable status set includes Pass, Fail, Corrected in Field, Needs Follow-Up, Pending Review, and Closed. Rejected or Reopened can be used when submitted evidence is incomplete or the issue remains unresolved.
Closed should mean verified.
Every failed item should include:
- an issue description
- the exact location
- the responsible party
- a due date in MM/DD/YYYY format
- the current status
- a supporting photo when the condition can be shown visually
Corrective-action systems perform best when every finding has an assigned party, a deadline, and signed or documented proof of completion. Escalation rules should also be set in advance. An imminent hazard requires immediate field controls, notice to the superintendent or safety manager, and stop-work or restricted-access action when conditions justify it. A routine quality deficiency can be assigned a scheduled due date.
These rules form the basis for mobile form logic and issue tracking in the next step.
sbb-itb-5eea312
Step 2: Build forms that work in the field
With roles and status rules in place, the form should capture only the fields required to complete and close the inspection. Reliable records depend on forms built for field use: one-handed mobile entry, limited connectivity, and crews moving between work areas during the day. Excessive typing and extra taps often produce vague entries.
Use practical template fields for repeatable inspections
Build a separate mobile template for each inspection type so crews see only the fields tied to that task. Each template should begin with a compact identification block that auto-populates wherever possible: project ID, jobsite, inspection type, date/time, inspector, location, trade, and drawing or specification reference. Requiring crews to enter that information from scratch on every record increases errors and slows completion.
Use Pass, Fail, N/A, or Observation responses, and write each checklist item as a single observable condition. Guardrail installed at open edge is more useful than Check fall protection. Where tolerances apply, state the allowed range directly in the item label, such as Anchor spacing: enter inches; acceptable range: 6–8 inches, and include the governing detail.
A safety-walk template covers housekeeping, fall protection, access routes, PPE, excavation conditions, electrical hazards, and emergency readiness. An equipment-check template identifies the equipment, asset number, hour-meter reading, guards, controls, fluid leaks, damage, and whether the equipment is safe to operate. A framing-review template addresses dimensions, connections, openings, blocking, bracing, and drawing references. A punch-list template captures location, defect description, responsible trade, priority, due date, completion evidence, and final acceptance. Each template should use the same identification block while keeping trade-specific checks separate.
Apply conditional fields to reduce form clutter
Use conditional fields to display only the information needed when an item fails or requires a measurement. Extra fields should appear only when the response calls for them.
When an item is marked Fail, the form should display a deficiency description field, exact location, severity or priority, corrective action, responsible person or company, due date, and a required photo attachment. When an item involves a tolerance check, measurement fields with explicit U.S. customary units – inches, feet, pounds, psi, or degrees Fahrenheit – should appear alongside the allowed range and the instrument or method used. Signature fields should remain hidden until all required checklist items are complete and any mandatory corrective actions have been assigned.
Too many required fields create the opposite result. When every screen demands input regardless of context, crews often enter rushed or generic responses just to move forward. A practical pre-release test is to have a foreperson, a superintendent, and a subcontractor complete the same form during an active walk, then review completion time, skipped items, and clarification requests before deployment. If the form captures the issue cleanly, the record can move into assignment and closeout without re-entry.
Capture photos, notes, and signatures as linked evidence
Attach photos, notes, and signatures to the exact checklist item so office staff can review the record without reconstruction. A disconnected batch of camera uploads forces the reviewer to determine which image matches which finding, which wastes time and increases interpretation errors.
A repeatable photo method uses three images per finding:
- an overview showing the broader location
- a context image showing how the condition relates to nearby work
- a close-up documenting the specific defect, measurement, label, or installation detail
Each image should be attached directly to the related checklist item with a brief caption – for example, North stair landing – missing guardrail at second-floor opening – and annotated with arrows or markings when the condition is not immediately visible.
Deficiency notes should answer four questions: what is wrong, where it is, why it matters, and what action is required. Measurements should include a numeric value, the unit, and the applicable tolerance. Vague notes should be avoided; the reviewer should be able to understand the issue without follow-up.
Electronic signatures are required only when they confirm a defined event: inspector completion, supervisor review, subcontractor acknowledgment, or client acceptance of corrected work. Each signature should show the signer’s name, role, company, date, time, and purpose. The signature step should appear after required items and corrective actions are complete. That sequence makes mobile submission ready for issue tracking and review.
Steps 3-5: Move inspections from the jobsite to closeout
A completed form does not complete the process. What happens next – submission, issue creation, and routing – determines whether an inspection becomes a dependable project record or remains an isolated file.
Complete and submit inspections on mobile devices
Field inspections should follow the same sequence each time. The inspector opens the correct project and template, confirms the jobsite location, floor, room, or asset, completes each checklist item, and records each response as Pass, Fail, or Not Applicable. Photos and notes should be attached to the checklist item at the time of inspection. Deficiencies should be created when they are found, not reconstructed later from memory.
Before submission, the record should be checked for completeness. Photos must be readable and linked to the correct finding. Failed items should include descriptions. Drawing references should be added where needed. Corrective-action issues should already exist for failed conditions. Required signatures should be collected, and the record should not contain missing information. Dates and times should follow U.S. format, such as September 27, 2026, 2:30 PM.
Basements, remote sites, and steel structures often have weak service. In those conditions, the mobile app should cache the active project and the needed forms before the inspector enters a low-connectivity area. Checklist responses, photos, notes, and signatures should be stored locally. The app should display a clear pending-sync status and sync the full record automatically when connectivity returns. Office staff should review sync errors or duplicate submissions instead of sending field staff back to enter data again. Once the record syncs, each deficiency should enter the issue workflow.
Track deficiencies through assignment, review, and closure
Each field deficiency should become a tracked issue. Every issue should receive a unique issue number and a direct link to the source inspection record. The issue record should include the exact location, an objective description of the condition, the drawing or specification reference, severity, trade, due date, and status. For example: Issue Q-0264 – north stair, Level 2 landing; top rail is loose at the west post; reference Sheet A-501, Detail 4; severity: major; responsible trade: framing contractor; due date: October 2, 2026.
A single lifecycle reduces confusion: Identified → Assigned → In Progress → Ready for Review → Accepted or Rejected → Closed. When the assignee marks the work complete and uploads evidence, the issue moves to Ready for Review. A qualified reviewer then confirms the correction, records the decision, and accepts or rejects the item. If rejected, the issue returns to In Progress with the reason documented. Once closure rules are in place, routing can occur automatically based on the result.
Route records to the right team without re-entry
Outcome-based routing keeps one record moving through the process without manual re-entry. Passed inspections should be stored in the project record and shared with the superintendent, project manager, owner, or design professional based on the project’s distribution rules. Failed inspections should automatically create one or more corrective-action issues linked to the original record and notify the responsible trade. Urgent safety findings should notify the competent person, superintendent, and safety manager at once rather than waiting for a daily report.
When corrective work is complete, the issue should return to the reviewer within the same record. The original failed inspection should remain unchanged. Completion evidence should be added without overwriting the original finding.
Step 6: Scale and improve the process across projects
Once inspections route and close correctly, the next challenge is maintaining that standard across every project through shared templates, permissions, and metrics. The next step is to standardize the process so each project follows the same rules.
Use Contractor Foreman to connect inspections with project records
Inspection records are more useful when they remain tied to the project rather than stored as separate files. Contractor Foreman keeps inspections, construction daily logs, punch lists, schedules, photos, and project documents in the same project environment, allowing office staff to review related records without re-entering data.
Custom templates allow teams to apply one inspection standard across unlimited projects, with project-specific fields added only where needed. Custom templates, role-based permissions, and integrations support standardized inspection workflows as project volume increases. The client portal gives owners controlled visibility into inspection status and project documents.
Once records are centralized, performance can be measured across every job.
Measure workflow performance and fix weak points
Scaling a workflow without measurement leads to inconsistent results. Six core indicators show where the process breaks down: same-day submission rate, percentage of forms returned for missing information, time from issue identification to assignment, median time to correction, percentage of issues closed by the due date, and repeat findings by trade or location.
Each metric should be defined before tracking begins. For example, same-day submission means the record was submitted by 11:59 p.m. local time on the inspection date. Time to assignment runs from the recorded finding timestamp to the first named assignee.
Results should be reviewed by crew, trade, location, and project rather than by company-wide averages. A high return rate usually indicates unclear field instructions or too many required fields. Long assignment times often point to missing ownership or weak notification rules. Repeated findings by the same trade or in the same area indicate that corrective action did not address the root cause. In those cases, the checklist may need revision, a photo may need to be required before concealment, or an earlier trade review may need to be scheduled.
Reviewing one or two fixes each month with a named owner and a clear comparison period helps keep the process under control.
Conclusion: What makes a digital inspection process reliable
A digital inspection process is reliable when the workflow is defined before rollout, forms are ready for field use, issues are tracked through closure, and permissions and metrics remain current. Consistent records improve accountability because each finding is timestamped, linked to a named inspector, and traceable through assignment and closure. Project closeout moves faster because inspections, corrective actions, verification evidence, and final approvals already exist in a retrievable format. The process works across multiple projects when the standard operating model is reviewed regularly and performance data is used to simplify the workflow rather than add more steps.
FAQs
How do I start a digital inspection workflow?
In Contractor Foreman, begin in the Inspections module under Project Management. Select + Inspection to create a record, then assign the project, inspection type, and responsible team member.
Inspection checklists are built in the Forms and Checklists module with either the Basic or Advanced form builder. Once the form is published, field staff can complete inspections in the mobile app, attach photos, and collect signatures from the jobsite.
What should I require before closing an issue?
Before closing an issue or punch list item, all related items should be fully resolved. Corrective actions should be completed, documented, and assigned to the responsible party.
Photo evidence of the completed work should be included. Completion dates and work descriptions should be verified for accuracy, and any required signatures should be collected before final submission.
How do offline inspections sync back to the office?
Contractor Foreman’s offline-first inspection tools allow field crews to collect data, complete checklists, and capture photos or signatures without an internet connection.
When the device reconnects, the system automatically syncs that information back to the office, which keeps inspection records accurate and current in the centralized project management platform.