
“HELP! Call the ambulance!”
“QUICK!!!”
Thirty seconds earlier, everything was calm as Sunday morning.
Mike had been standing on a scaffolding plank, calling down measurements to the crew below. But all of a sudden, the plank cracked and he dropped six feet onto a stack of rebar.
Someone had noticed the crack in that plank the day before, of course, but they thought “Eh, it’ll hold for one more day.”
Mike’s okay now — more or less. Broken wrist, a concussion, and a long conversation with his wife about whether he still wants this job.
But the next accident on your construction site might be something graver and could cost you a life, and even your business. After all, OSHA reported 389 fatal falls in 2024. That’s just for falls and deaths. There are plenty of other ways an accident happens — struck by falling debris, run over by equipment, caught in machinery, electrocuted by a live wire. And what about the ones who don’t die, but lose a limb, or can’t work again?
No, you don’t really want any of that — not even a small bruise on a leg.
So instead of hoping someone “uses their common sense” or is “responsible enough to take the next steps” (aka manual safety checks), automate safety checks.
Connect safety checks to your construction software so it becomes part of the process, instead of another step to think about (or forget).
Here’s how to do it:
- Inspection templates by job type and risk
- Set triggers tied to the start of day, project phase, or scheduled work
- Mobile forms with timestamps, location, signatures, and photos
- Corrective tasks for every failed item
- Re-inspection before closeout
- Searchable records for audits, claims, and OSHA compliance files
How does this actually look like in the job site?
Simple. A superintendent, foreman, or safety manager completes a checklist on a phone or tablet. If an item fails, the system sends it to the right role, adds a due date, and keeps it open until a follow-up check confirms the hazard is gone.
That structure cuts missed inspections, shortens reporting delays, and leaves a clear trail of photos, dates, signatures, and status changes.
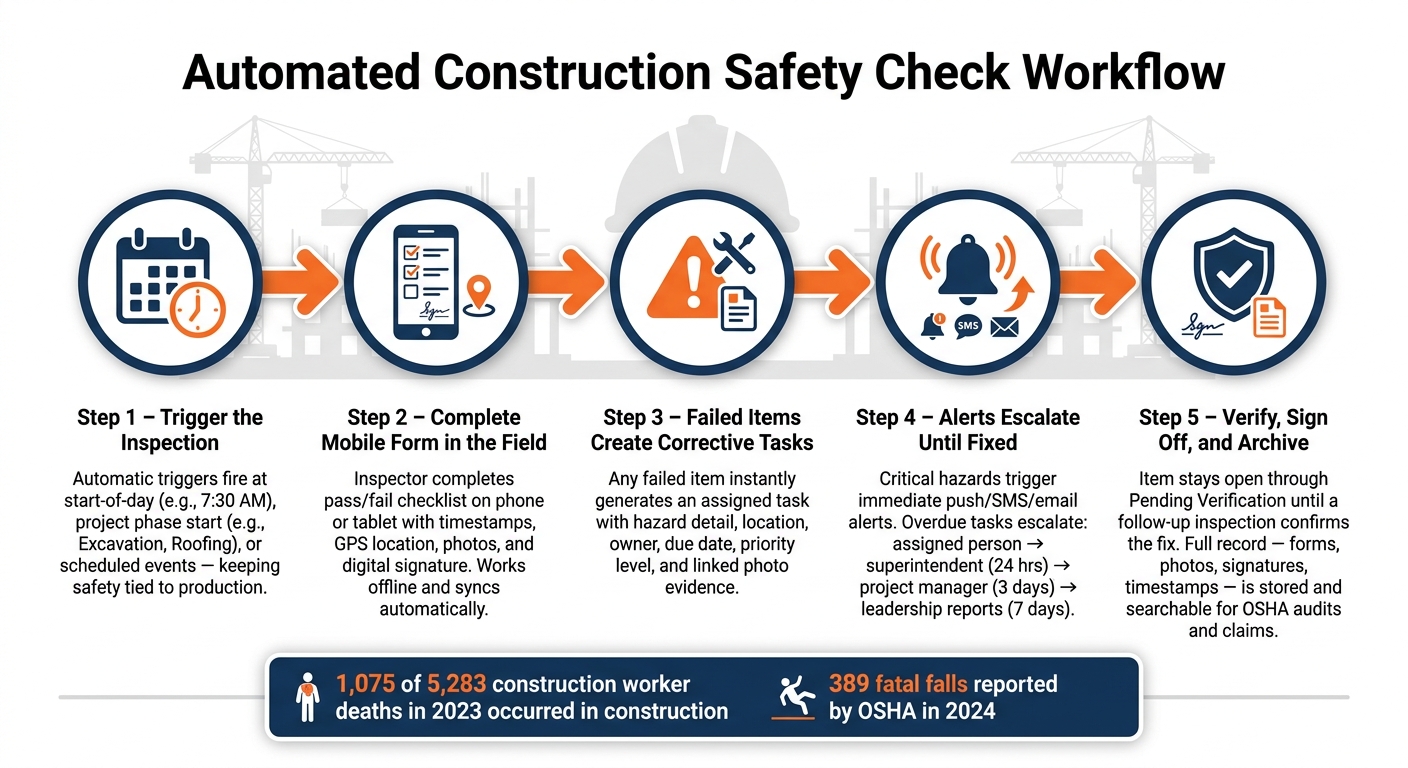
Automated Construction Safety Check Workflow: 5 Key Steps
How to Set Up Inspection Workflows in Construction Software
Each inspection workflow needs four parts: a template, an owner, a trigger, and a closeout step.
Build Inspection Templates by Job Type and Risk Level
One generic form does not fit every inspection. A daily site walk on a commercial project covers different issues than a pre-task check before high-risk work or a weekly review on a residential framing job. Templates should match those conditions.
A practical starting point is to group templates by job type – such as ground-up commercial, residential framing, heavy civil, and tenant improvement – and by risk level – low, moderate, or high. Each template should then cover only the hazard categories that fit the work.
A daily site walk template might include:
- Housekeeping
- Access and egress
- Floor openings
- Temporary power
- Scaffold and ladder setup
- Weather-related conditions such as heat, cold, wind, or ice
A trenching review should stay focused on soil conditions, protective systems, spoil pile placement, access and egress, and water accumulation checks.
Each item should use a simple pass/fail or compliant/non-compliant response, include a notes field, and allow photo attachments. That keeps field completion fast and still leaves a clear record for audits and claims.
Once the form is standardized, it should be tied to the person and project event that starts it.
Assign Due Dates, Roles, and Project Triggers
Role assignments should match the actual chain of responsibility on the jobsite. Superintendents usually handle daily site walk inspections. Foremen handle pre-task checks, such as ladder setup checks or PPE compliance before work begins. Safety managers handle weekly or monthly program-level audits.
Triggers should match field events, not just calendar dates. A start-of-day trigger at 7:30 AM local time works well for daily site walks. A phase-based trigger tied to “Excavation – Start” or “Roofing – Start” helps make sure trenching and fall protection checks happen before work starts. Pre-pour inspections can be scheduled for the day before each concrete pour, which gives the superintendent time to fix issues before the crew arrives.
When those triggers are linked to the project schedule, safety inspections stay visible next to production tasks instead of turning into a separate office chore.
In Contractor Foreman, that comes down to one template, one owner, and one trigger for each recurring inspection.
Set Up Recurring Safety Workflows in Contractor Foreman
Contractor Foreman brings inspections, daily logs, scheduling, document management, and mobile access into one system, which helps keep safety workflows tied to day-to-day project operations.
A recurring daily safety inspection on a commercial project usually follows this setup:
- Create the inspection template for “Daily Site Walk – Commercial” with checklist items covering housekeeping, fall protection, access/egress, temporary power, scaffolds and ladders, equipment condition, and PPE compliance.
- Set recurrence to every weekday at a set time, such as 7:30 AM local time, for the project’s duration.
- Assign the responsible role – usually the superintendent or foreman – and set notifications for the safety manager and project manager when an inspection is missed or any item fails.
- Link the inspection to the daily log so completed findings fill the safety section of that day’s record automatically.
- Connect failed items to corrective tasks.
Failed items should move straight into follow-up tasks.
sbb-itb-5eea312
How to Use Mobile Forms and Photo Records in the Field
Collect Required Field Data on Mobile Forms
Every mobile safety form should follow the same setup so inspection records are complete in the field, not patched together later in the office. Each form should capture the checklist result, notes, inspector name and signature, timestamp, location, and weather and work-area conditions. Use U.S. units, MM/DD/YYYY dates, and plain labels on every form.
Offline capability matters on active jobsites. Low-signal areas can cut off service, and a lost connection should never stop an inspection from being recorded. Offline forms store responses, notes, and photos on the device, then sync once service comes back, with no need to enter anything again. Assigned inspections should be downloaded before the crew arrives.
Keep response options tight and consistent across crews:
- Pass
- Fail
- Not applicable
Failed items should also include a severity level and a required comment so follow-up can be sorted by urgency.
Once the field record is finished, failed items can move straight into follow-up.
Attach Photos as Proof of Conditions and Corrections
Data by itself does not tell the whole story. Photos confirm what the form records. A note helps, but a timestamped photo tied to the checklist item carries more weight. Photos taken inside the safety app stay linked to the exact finding, with timestamps and project or location tags that connect the image to a specific place and time.
Before-and-after photos should be required for failed items. If a guardrail is missing, the hazard needs a photo. A second photo should be required before the item is closed. The first image shows the condition at the time of inspection. The second shows that the fix was made.
The table below shows when photos, notes, and signatures are required across common safety record types:
| Record Type | Photo Requirement | Note/Description | Signature Requirement |
|---|---|---|---|
| Failed Inspection Item | Required (proof of deficiency) | Required (correction needed) | Required (inspector/foreman) |
| Corrective Action | Required (proof of fix) | Required (action taken) | Required (verification) |
| Safety Incident | Required (evidence of event) | Required (detailed log) | Required (employee and supervisor) |
For photos to hold up in an audit or claim, take both wide shots and close-ups. Wide shots show overall conditions. Close-ups show the exact hazard or correction. Each photo also needs a short, specific caption – “missing mid-rail, north stair, Level 3” – instead of a generic file name. Photos left in a personal camera roll or a shared folder lose their tie to the inspection record.
These records feed the failed-item alerts and corrective tasks that come next.
Turn Failed Checks Into Alerts and Corrective Tasks
Create Assigned Tasks From Failed Inspection Items
A failed check should trigger the fix at once. When an item fails, the system should create a corrective task that includes the hazard, location, owner, due date, priority, and linked photos.
Specific details cut out guesswork. If an inspector marks “Power tools and cords in good condition” as a fail on the south elevation, the system can create this task: “Replace damaged 50 ft extension cord – South elevation staging area,” assigned to the electrical subcontractor foreman, due in 24 hours, marked High priority, with the inspection photo attached and the note: “Tag out until replaced.” In Contractor Foreman, failed inspection items can be converted into tasks or punchlist items tied to the project and the original inspection record.
Send Alerts for Urgent, Overdue, and Repeat Issues
Alerts need to fit the level of risk. Critical hazards like fall from height, exposed live conductors, and trench wall instability should trigger immediate push notifications, SMS, and email to the superintendent, safety manager, and project manager as soon as the task is created. Some contractors also set a “Stop Work” flag for these items, which tells supervisors to pause work in that area until the task is closed and re-inspected.
Overdue notices should escalate in stages:
- On the due date, the assigned person gets a reminder.
- After 24 hours, the overdue notice goes to the assigned person and superintendent.
- By day three, the project manager and safety manager are notified.
- By day seven, the issue shows up in leadership reports.
The alert should spell out both the risk and the delay. “Overdue High-risk task: Clear trip hazards from main stairwell – Project ABC, 3 days overdue” gives the needed context at a glance.
Repeat failures matter too. If the same hazard type fails three times within 30 days for one crew or area, a repeat-issue alert should go to the project manager, safety manager, and the subcontractor’s office contact. That pattern helps direct corrective action and training where the problem keeps showing up.
Dashboards track open safety tasks, critical alerts, overdue corrections, and repeat issues by project. In Contractor Foreman, notifications can be set by role so foremen see only the tasks assigned to them, while superintendents and safety managers see all project items. Open tasks remain active until the next inspection confirms the correction.
Verify Closure and Keep a Compliance Record
Re-Inspect, Sign Off, and Keep Items Open Until Verified
When a failed item turns into a corrective task, closure should not happen the moment someone says the fix is done. The item stays open until a follow-up inspection confirms the hazard is gone.
A clear status flow helps prevent mistakes:
- Open
- Corrective Work Complete
- Pending Verification
- Closed – Verified
In Contractor Foreman, a failed inspection can be copied with a single click to create a re-inspection task. That keeps the original location, photos, owner, and hazard description tied to the same record. The re-inspection can then be assigned to a safety manager, superintendent, or QA/QC reviewer. The result should be logged on a checklist connected to the original failure.
Until the verifier applies a digital signature or approval step and moves the item to Closed – Verified, it remains in Pending Verification and stays visible on the safety dashboard.
Keep Searchable Records for Audits and Claims
Each closed safety issue should contain the full paper trail: the original inspection form, corrective task details, assigned owner, due date, completion date, verification method, before-and-after photos, timestamps in MM/DD/YYYY format and local time, and the sign-off record. The approval trail should show that the correction was verified, not just attempted.
Records sorted by project and date are much easier to pull during an audit or claim review. OSHA Forms 300, 300A, and 301 must be kept for five years after the year they cover. Contractor Foreman supports that process by storing inspection forms, corrective actions, signatures, and photos with the project and making them easy to search later.
Conclusion: The Core Steps for Automated Safety Checks
Automated safety checks follow a simple sequence: log the issue, assign the fix, verify it in the field, and archive the record.
FAQs
How do automated safety checks reduce missed hazards?
Digital safety checks cut missed hazards by replacing paper forms, which are easy to skip, lose, or fill out halfway, with checklists that require critical safety details before work can move forward.
Real-time mobile reporting also changes how crews handle risk in the field. Hazards and near-misses can be logged on the spot with photos, GPS tags, and timestamps. The system then alerts the right team members for follow-up and helps spot patterns, so root causes can be addressed before the same problem shows up again.
Who should own failed safety items on a jobsite?
Failed safety items should go straight to the subcontractor or crew member tied to that work.
When an inspection fails, the system can turn it into a punch list item, attach photos, and assign it from a mobile device. For critical issues, it can also set deadlines on its own, generate work orders, and notify the right team members.
What records should contractors keep for OSHA and claims?
Contractors should keep full records of jobsite activity, safety compliance, and incidents. That includes OSHA 300 logs, injury and near-miss reports, disciplinary records, and supporting details like photos, signatures, and written descriptions.
Inspection reports, safety meeting sign-in sheets, and daily jobsite logs matter too. Those daily logs should cover weather, crew activity, materials, and safety notes.
A digital record system makes it easier to back up audits and claims with clear documentation.