
- Here’s how to create a jobsite inspection report PDF that actually does its job
- How to Build the PDF Layout and Core Fields
- Trade-Specific Checklists and a Findings Log
- File Naming, Storage, and Revision Control
- How Contractor Foreman Supports Inspection Records
- Conclusion: The Minimum Standard for a Useful Inspection PDF
- FAQs
Do we really need a PDF inspection report template?
There’s only one answer: Definitely.
It sounds like paperwork (and it is), but it’s actually the kind that can save your skin.
Say the client holds back the final payment six months after a project wraps, claiming the electrical work was never properly inspected. Everyone remembers the inspection…but everyone remembers it slightly differently. So the report comes out, and under “Electrical” it says: “Inspected. See notes.” There are no notes. There is, however, a very confident checkmark.
That’s a report that proves almost nothing, and if a serious safety violation is involved, it can also mean thousands of dollars in OSHA penalties. Not a great return on a single sheet of paper.
A solid PDF inspection report template, built around OSHA requirements, settles the question in advance. It decides what gets written down, instead of leaving each inspector to guess. Left to guess, people record whatever is easiest: the date, the temperature, a general impression that things looked fine.
Filling out the report is only half the job, though.
Proper revision control keeps anyone from working off an outdated version, and a controlled project record means the right people can find the report when they need it.
After all, a thorough inspection report is only useful if someone can locate it, and ideally the current version.
Here’s how to create a jobsite inspection report PDF that actually does its job
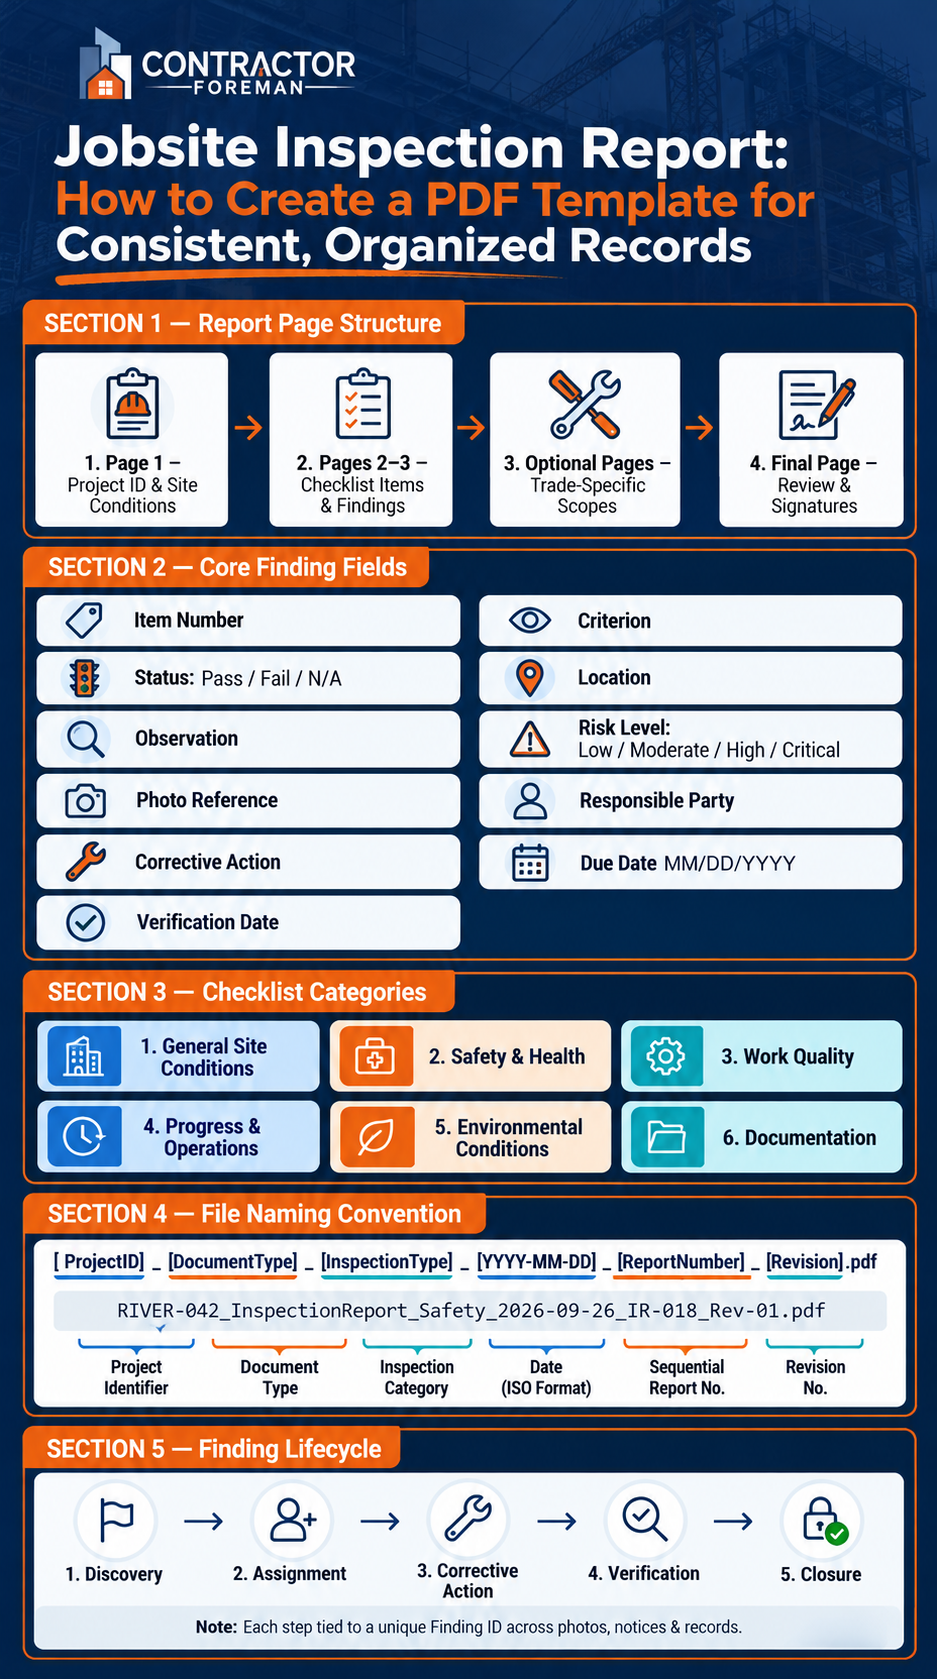
Job Site PDF Inspection Report: Structure & Workflow
How to Build the PDF Layout and Core Fields
Build the core PDF as a clean, single-purpose layout before adding fillable fields. The format should work on paper and on mobile screens. Use focused sections, high-contrast text, and enough white space for fast use in the field. The page arrangement should make the report quick to complete onsite and easy to review later.
A practical structure is:
- Page 1: for project identification and summary
- Pages 2–3: for checklist items and findings
- Extra pages: for trade sections
- A final page: for review and signatures
Fillable fields should function in the electronic file, while printed copies should still provide blank lines or checkboxes. Keep the layout readable on standard U.S. Letter paper, 8.5 × 11 inches, and avoid wide tables that create horizontal scrolling on mobile devices. This format keeps the report efficient in the field and straightforward to audit later.
Header, Footer, and Project Identification
Each page should contain enough information to stand on its own if printed, scanned, or separated from the original file. A compact header should repeat the report title, project name and number, and site address. Place the report number and date in the center, with the inspection type or company name aligned to the right. The footer should show Page X of Y, the PDF revision or issue date, and a controlled-document label when required.
Page numbers should update automatically when pages are added or removed. Critical information should remain clear of the page edge so standard printers do not clip it.
The first page should record the inspector, site contacts, attendees, and work shift details. Weather conditions, temperature in °F, and general site conditions should also appear on page 1 so the report can stand alone without reference to a separate log.
Checklist Categories and Finding Fields
After the page sequence is established, define the standard field blocks that repeat across inspections.
The inspection body should be organized into consistent categories so the site walk can follow a set pattern:
- general site conditions
- safety and health
- work quality
- progress and operations
- environmental conditions
- documentation
Numbering items by category prefix, such as SH-04 for the fourth safety-and-health item, makes findings easier to reference in photographs, correction notices, meeting minutes, and later reviews.
Each checklist row should combine structured selections with narrative space. Use checkboxes for yes/no and applicable/not applicable decisions. Use radio buttons or drop-down menus where only one status can be selected, such as Pass, Fail, N/A, Open, Accepted, Rejected, Corrected, or Verified.
Provide multiline narrative boxes for observations and corrective-action descriptions. Observation and corrective action should remain in separate fields so each finding records both the condition found and the action required. Fields should be large enough for touch entry, with clear labels and a logical tab order.
Once the page structure is fixed, use the same field set on every job to keep reviews consistent.
| Field | Purpose |
|---|---|
| Item number | Stable reference for discussion and correction tracking |
| Criterion | States the observable requirement being checked |
| Status | Records Pass, Fail, N/A, or another defined result |
| Location | Room, floor, elevation, gridline, or site-map reference |
| Observation | Describes the actual condition found |
| Risk level | Low, Moderate, High, or Critical |
| Photo reference | Links the finding to an image filename or photo number |
| Responsible party | Assigns ownership of the corrective action |
| Corrective action | States the specific required remedy |
| Due date | MM/DD/YYYY deadline for correction |
| Verification date | Records when completion was independently confirmed |
Example: SH-04, east stair tower, guardrail opening at the third-floor landing; high risk; Photo 08; framing subcontractor; install compliant guardrail before access resumes; due 09/30/2026.
Signature and Review Controls
Signature blocks should appear on the final page for both the inspector and the site representative. Each block should capture printed name, role, company, signature, and date/time. When project manager, quality control, or owner review is required, include a separate reviewer block with its own status selection and comment field.
The form should state that signatures confirm receipt and review, not blanket approval of the work. When electronic signatures are used, retain the signer’s identity, date/time, and link to the issued PDF under the company’s document-control policy. After signature, lock the PDF as read-only or flatten it to preserve the issued record.
Trade-specific pages and the findings log can extend this base format without changing the core record.
sbb-itb-5eea312
Trade-Specific Checklists and a Findings Log
Use the fixed core PDF as the base document. Add trade pages only for active scopes of work. Those added pages should feed the same findings log so the report remains one continuous record.
Optional Trade Pages by Scope of Work
Trade pages should be added by scope, not by project size. Each page should remain narrow in purpose and limited to the active trade. One focused page per trade is usually sufficient, covering only the checks tied to that scope.
For example, a concrete page may verify reinforcing, cover, embedded items, and test cylinders. A roofing page may cover substrate, seams, flashing, and manufacturer requirements. A small electrical scope may require only one page. A larger project may include separate pages for concrete, framing, roofing, and MEP work.
Each trade page should identify the trade, inspection phase, and applicable drawing or specification section at the top. That keeps the checklist functioning as a verification tool rather than a restatement of contract requirements.
Trade pages define what must be inspected. The findings log records what failed, who is responsible, and how the item was closed.
Findings Log Format for Field Use and Follow-Up
The findings log is the central record in the inspection report. It is where deficiencies move from initial observation to final resolution. Every entry should include a unique finding ID that does not change through correction and closure. That same ID should be used across photographs, correction notices, and related project records so each item can be tracked without confusion.
Findings should be written in factual terms. For example, Two 4-inch conduit sleeves are missing at Grid B-5 on Level 2 is specific and actionable. Electrical rough-in is incomplete is not. In addition to the core fields defined in Section 2, each finding should record the governing reference document, any immediate action taken, the verification method, the verifier, and the closure status.
For printed packets and desktop review, a landscape table is often the most practical format. For phone or tablet use, stacked finding blocks are usually easier to manage. In that format, each finding appears in its own vertical entry with larger text areas, photo capture, and status controls.
F-014 | Roof Area R-2, east parapet, Grids 8–9 | Counterflashing not installed at approx. 12 LF; membrane termination exposed. Ref: A-502 Rev. 3, Detail 7; Spec 07 62 00 §3.3. Severity: Major. Photo: 06. Action: install approved counterflashing and seal termination before roofing closeout. Assigned: roofing subcontractor. Due: 09/30/2026. Status: Open. | Closed 10/02/2026 – flashing installed, termination sealed, photo attached. Closed by J. Smith.
A finding should be closed only after the verifier records acceptance evidence.
Evidence Fields That Support Later Review
Evidence fields should appear beside each finding rather than in a separate appendix. For photo references, the caption should state what appears in the image and where it was taken. For example, Photo 04 - north face of Level 3 masonry at Grid C-7; missing through-wall flashing visible below window opening identifies the condition and location. The record should also include viewpoint, date, time, and photographer.
For test-based findings, record the test name, date, technician, sample number, result, acceptance criterion, and attachment reference. If a site representative disputes a finding, a separate comment field should record that response without changing the original observation. All evidence, including photos, test reports, and comments, should be tied to the finding ID so the record remains traceable from discovery through closure.
File Naming, Storage, and Revision Control
After the report layout is set, file control determines whether the PDF can still be located, relied on, and reviewed later.
Use a Consistent File Naming Convention
The file name should identify the report without requiring the file to be opened. The recommended format is:
ProjectID_DocumentType_InspectionType_YYYY-MM-DD_ReportNumber_Revision.pdf
A project file might look like this: RIVER-042_InspectionReport_Safety_2026-09-26_IR-018_Rev-01.pdf. ISO dates should be used in file names so documents sort correctly in any folder. Allowed values should be defined before the first report is issued. Underscores should separate fields, sequential numbers should be zero-padded (IR-018, Rev-01), and characters such as /, &, #, and % should be avoided because they create cross-platform compatibility issues.
Store Reports in a Controlled Folder Structure
Folder depth should reflect project complexity, but the hierarchy should follow the same pattern across projects:
RIVER-042_Riverside_Renovation/
  Inspections/
    2026/
      Safety/
        Open Findings/
        Closed Findings/
        Attachments/
      Electrical/
        Open Findings/
        Closed Findings/
        Attachments/
      Concrete/
        Open Findings/
        Closed Findings/
        Attachments/
Evidence should be stored in Attachments so each file remains tied to its report number. Each attachment should also be named to match the parent report, such as RIVER-042_IR-018_Photo-003.jpg.
Access permissions should be role-based rather than open to all project participants. Inspectors may upload reports and supporting files. Project managers or quality managers may review and approve them. Subcontractors may receive findings assigned to them. General site users should have read-only access to issued records. The system should retain upload history and prevent unauthorized deletion.
Track Revisions Without Overwriting Issued Reports
An issued inspection report should be treated as a permanent record. Any correction or update requires a new revision rather than an overwrite.
Each revision entry should record:
- revision number
- revision date
- the person who made the change
- the reason for the change
- the specific sections or findings affected
- the reviewer or approver
For example:
Rev-01: Corrected Finding F-004 location from Level 2 to Level 3, added Photo 004, prepared by J. Lee on 09/28/2026, reviewed by M. Patel on 09/29/2026.
Superseded copies should be clearly marked and moved to an archive or Superseded location rather than deleted. Labels such as FINAL, FINAL2, or NEW should be avoided because they do not show revision sequence. The active folder should contain the current approved file, while prior versions remain archived for audit and dispute review.
The next section explains how Contractor Foreman keeps inspection records searchable and accessible after the site visit.
How Contractor Foreman Supports Inspection Records
After the PDF is issued, the next requirement is keeping its findings connected to follow-up work. Contractor Foreman keeps related photos, assignments, and follow-up notes tied to the same record.
Where Contractor Foreman Fits in the Inspection Process
Contractor Foreman can serve as the secure project record system around a standardized PDF inspection report. Its inspection settings support configurable categories and custom fields, which allows companies to capture details such as inspection type, area or building level, responsible trade, permit number, severity, due date, and corrective-action status. That structure helps the digital record match the PDF template already in use.
Field personnel can complete inspections on a phone or tablet, upload photographs, and attach the completed PDF directly to the project record for office review. When a finding depends on permit status, the inspection record can be linked to the related permit through the Permit Manager, which creates a cleaner compliance trail. The PDF remains the signed record, while the platform manages the active workflow.
How Inspection Records Stay Usable After the Site Visit
The issued PDF remains the stable, signed document of record. Contractor Foreman functions as the project record around it: photographs, supporting documents, assigned corrective actions, and verification evidence remain attached to the project file.
Each unresolved finding should be assigned to a responsible person with a due date. Closure should require attached verification evidence, such as a follow-up photograph or a reinspection note, before the item is treated as fully closed for audit purposes. Company procedures and retention rules still govern the official record, the required retention period, and the export process if the project is archived or transferred. That standard keeps the inspection PDF usable after the site visit.
Conclusion: The Minimum Standard for a Useful Inspection PDF
A reliable inspection PDF should produce a complete, verifiable record that supports field completion, office review, and documented closure of each finding. At a minimum, that includes clear project identification in the header, standardized checklist categories, trade-specific add-on pages where needed, a findings log with precise locations and severity ratings, evidence fields for photographs and supporting documents, and dated signatures from the inspector and reviewer.
A platform such as Contractor Foreman can keep the PDF connected to corrective actions, permit records, and project photographs. The most durable inspection record combines a carefully structured PDF with a consistent field procedure and controlled document management.
FAQs
What makes an inspection PDF legally defensible?
A legally defensible inspection PDF requires a clear audit trail that documents compliance and accountability. The record should include the project name, site location, inspection date and time, inspector details, and clear status indicators.
Sign-offs and date stamps should confirm who performed the work and when it occurred. Photos with GPS coordinates and timestamps provide objective evidence of site conditions. Contractor Foreman can strengthen the record by linking inspection documents to permits and applying digital signatures.
How should I track open findings to closure?
Use the Inspection Module dashboard to maintain centralized oversight of inspection activity. Filters by status, such as Open, In Progress, or Failed, make it easier to identify items that still require attention.
For progress tracking, inspections can be moved between status columns as issues are addressed. When re-inspection is required, Copy Inspection creates a new record while retaining relevant data from the original inspection, which supports a clear audit trail.
When do I need trade-specific inspection pages?
Use trade-specific inspection pages when standard reporting fields do not capture the technical data required for the work.
For example, HVAC contractors may need sections for refrigerant pressures, while framing crews may need fields for lumber grades. In Contractor Foreman, custom fields allow inspection templates to be tailored for these items while keeping documentation accurate, compliant, and consistent.