- Steps 1 and 2: Define the onboarding scope and set up the company account
- Steps 3 through 5: Assign roles, build templates, and configure schedules
- Step 6: Import project data and connect the tools your team already uses
- Step 7 and conclusion: Train first users, review early usage, and adjust the setup
- FAQs
- Related Blog Posts
Finally, you bought the construction software that cuts down 50% of your stress and doubles your productivity overnight — or at least that’s what their ad says.
So how come you’re not feeling any of its magic?
Did you just make another scam purchase?! Or is your crew just lazy?
The answer is probably neither. The real culprit is usually weak construction software onboarding.
You bought the platform, gave everyone access, and expected the team to just… use it.
You thought it was easy but a construction software rollout always sounds easier than it actually is. That’s why documents get messy, the scheduling module sits untouched, and worst of all — half the crew forgets their login by week two.
So how to do onboarding right?
The process usually works best when teams launch 1 to 2 core workflows first, assign role-based access, standardize templates, clean data before import, and check adoption in the first 2 to 4 weeks.
Here’s what actually works:
- Start with 1 to 2 weekly-use workflows
- Pick 2 to 3 pilot users from office and field
- Set company defaults before live project setup
- Limit access by role and by project
- Build repeat-use templates for jobs, documents, and estimates
- Import clean data in a set order
- Keep training sessions to 30–45 minutes
- Review usage early; under 80% adoption often signals setup or training gaps
This approach keeps the rollout focused, cuts confusion, and helps office and field teams use the same system from day one.
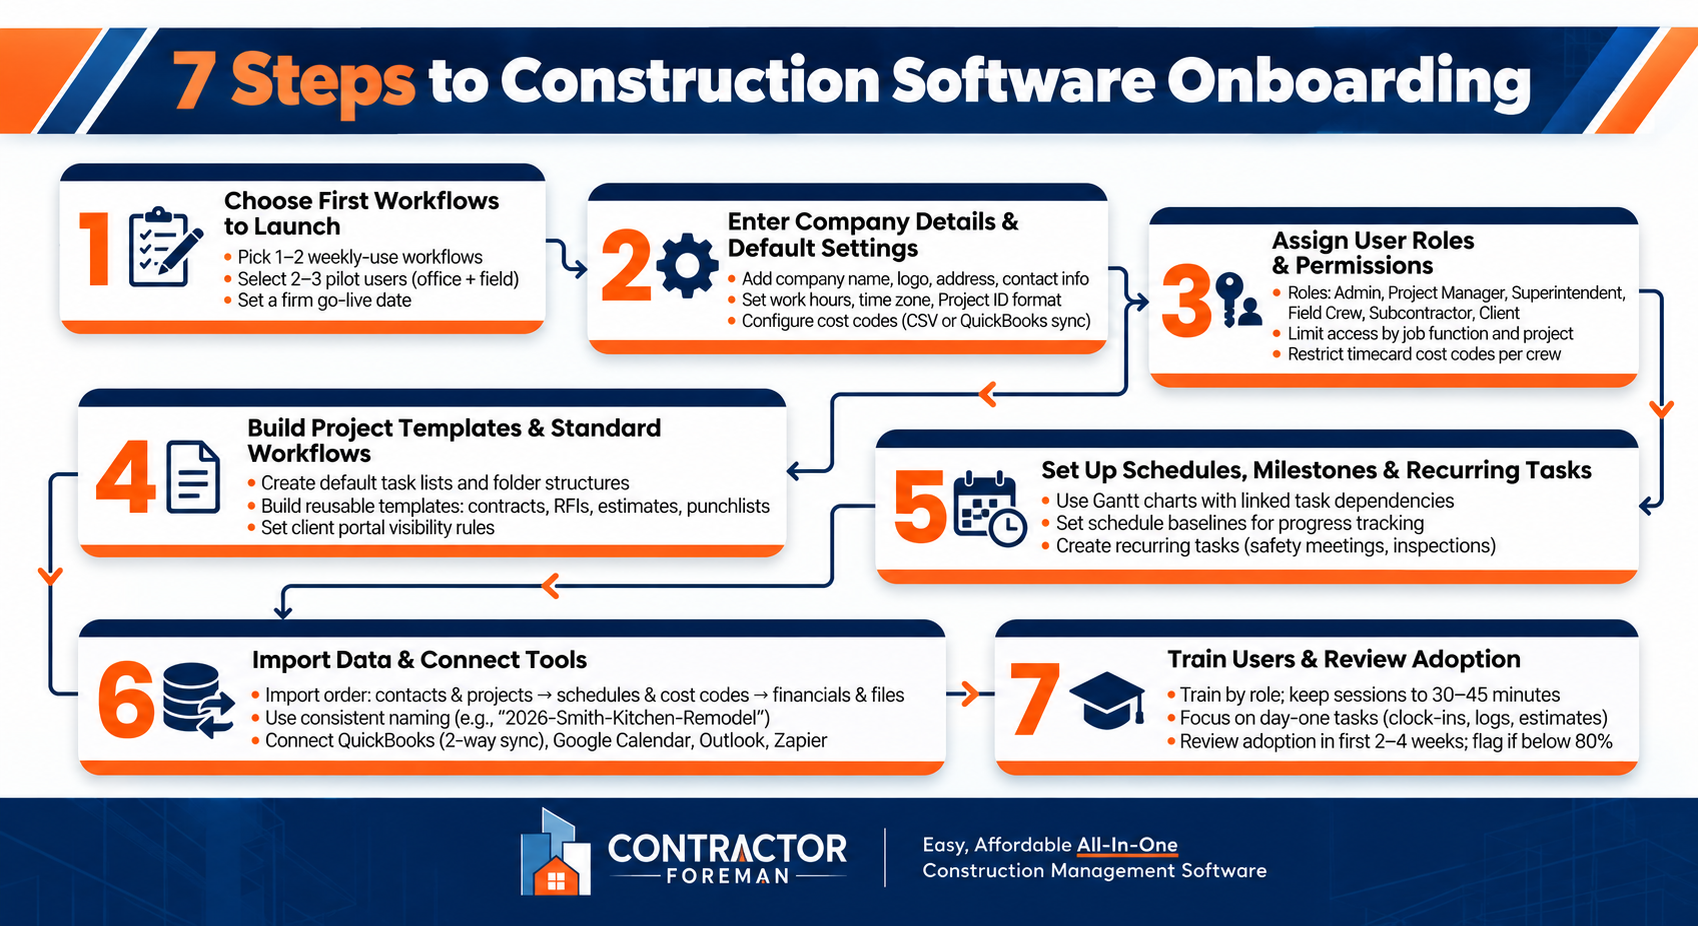
7-Step Construction Software Onboarding Process
Steps 1 and 2: Define the onboarding scope and set up the company account
Step 1: Choose the first workflows to launch
Start with the workflows your team uses every day.
Don’t switch on every feature at once. Pick one or two workflows your team uses weekly and get used to those first. A phased rollout is usually the safer move: launch one or two daily-use workflows, then add the rest over time. It keeps the process from turning into a mess.
It also helps to choose 2 to 3 pilot users from the office and field to lead the first phase. That mix matters. Office staff and field crews often hit different problems, so you want both points of view from the start.
Set a firm go-live date and stick to it. When that date arrives, retire paper and spreadsheet workarounds for those workflows.
Step 2: Enter company details and default settings
Start with the company name, address, contact info, and logo so estimates, invoices, and PDFs look professional from day one.
Then set your work hours, work days, and time zone to avoid scheduling conflicts and labor reporting issues. After that, configure your Project ID format using one consistent naming format. It sounds small, but this is the kind of setup work that saves headaches later.
You should also establish cost codes early so job costing stays accurate. You can import them by CSV or sync them from QuickBooks.
With the company account in place, assign access by job function.
sbb-itb-5eea312
Steps 3 through 5: Assign roles, build templates, and configure schedules
Step 3: Assign user roles and permissions by job function
Once the company account is ready, set access before you start building templates and schedules. That order matters. Field crews need schedules and timecards. Admins need full control. Everyone else should get access only to the parts they use day to day. Start with project management and scheduling first, then bring in financial features after you’ve tested the setup.
One setup choice pays off early: limit timecard cost codes so each crew only sees the codes that apply to their work. That cuts clutter and helps avoid bad entries. You can also use “Private” vs. “Shared” settings in the company calendar to keep management meetings out of view for field crews.
| Role | Setup Responsibilities | Restricted Access |
|---|---|---|
| Admin | Company settings, user permissions, financial integrations | None |
| Project Manager | Project schedules, budgets, change orders, RFIs | Company-wide payroll, other PMs’ projects |
| Superintendent | Daily logs, crew schedules, punchlists | Profit and loss reports, estimating databases |
| Field Crew | Daily time entry, photo uploads, assigned tasks | Financial data, internal notes |
| Subcontractor | Assigned tasks, bid packages, specific project files | Internal costs, other subcontractors’ bids |
| Client | Approvals, invoices, photos, schedule updates | Labor costs, markup percentages, internal notes |
For subcontractors and clients, project-level restrictions matter a lot. They should see only the jobs they’re assigned to and nothing outside those jobs.
Step 4: Build project templates and standard job workflows
After access is set, build the project structure your team will use on every new job. A solid template saves time and keeps people from rebuilding the same setup again and again.
At a minimum, each template should include a default task list and a standard folder structure for documents like Photos, Permits, Plans, and Contracts. From there, build reusable templates for contracts, subcontracts, lien waivers, proposals, estimates, RFIs, punchlists, and inspection checklists.
For estimates, include a default Scope of Work, standard line items, and preset tax percentages so bids stay consistent from one job to the next. For RFIs, connect them to change order requests. That way, when one issue affects scope or cost, the paperwork doesn’t drift off into separate places.
You’ll also want to decide early which templates or records clients can see in the client portal, such as schedules, photos, and invoices.
Step 5: Set up schedules, milestones, and recurring tasks
Before you load a live project, set the scheduling setup your team will use in the field. Gantt charts with linked task dependencies help keep the schedule current, because one delay can update dependent tasks on its own.
Set schedule baselines during setup so you can compare the original plan against actual job progress after work starts. For milestones like “Foundation Poured” or “Dry-In”, set them to trigger automatic notifications or client approvals.
For repeating work like weekly safety meetings, equipment inspections, and routine site walkthroughs, use the To-Do module to create them once and repeat them on a set cadence.
Once that framework is in place, you’re ready to clean the data and connect accounting and communication tools.
Step 6: Import project data and connect the tools your team already uses
With your roles, templates, and schedules set, the next move is getting your project data into the system.
Clean your data before import
Before you import anything, clean up what you already have. If you bring over duplicate subcontractor entries or messy project names, those problems come with you on day one.
Start by using one project naming format across the board. Something like “2026-Smith-Kitchen-Remodel” makes records easier to search and keeps the project list easy to scan. Then review your contact list and merge duplicate subcontractor records. That’s one of the most common import problems. It also helps to archive old completed jobs so your active project list doesn’t get cluttered.
After that, export your contacts, project lists, and cost codes from your old system as CSV files before you cancel any subscriptions. Contractor Foreman supports CSV imports for contacts, cost codes, and estimate items.
A simple import order helps keep things clean:
- Active projects and contacts first
- Then schedules, cost codes, financial data, and project files
Once your data is in good shape, connect the systems that need to work together right away.
Connect accounting and communication workflows
After the main import, connect the tools your office already relies on. The first one to handle is usually your accounting software. When those systems are connected, invoices, timecards, and job costs can sync automatically.
A two-way sync with QuickBooks keeps invoices, payments, job costs, and timecards moving between systems and cuts down on double entry.
Then look at communication and scheduling. Connect your calendar tools so project milestones appear in Google Calendar or Outlook for the whole team. If a tool doesn’t have a built-in connection, Zapier can help automate things like lead capture or file backups.
Step 7 and conclusion: Train first users, review early usage, and adjust the setup
With the data loaded and the tools linked, the next move is simple: train the team and make the new system part of the daily routine.
Use short training sessions tied to real tasks
At this stage, people don’t need a tour of every button in the software. They need to know how to do the work sitting in front of them. Train by role, not by feature. Field crews should learn on mobile devices. Office staff should train on desktop workflows. That keeps the sessions practical from the start.
Keep each session to 30–45 minutes and center it on day-one tasks. Think clock-ins, schedule updates, daily logs, estimate entry, and other work people will handle right away. Record each session so people can replay it later, and assign one or two internal champions who can answer questions when small issues pop up.
When the go-live date hits, switch crews fully to the new workflow. Half-in, half-out setups usually drag things down.
Review adoption in the first 2 to 4 weeks
Once the first few days pass, look at what people are actually doing in the system. Don’t assume the rollout is working just because training happened. Check login activity. Check entry quality. See whether the information in the system is usable, not just present.
If adoption drops below 80%, that usually points to gaps in training or weak buy-in.
Watch for signs that the setup is sticking:
- Crews are clocking in
- PMs are using schedules
- Estimates have enough detail to compare against actual costs
It also helps to ask both field and office staff where the process still feels clunky. Those early comments can save a lot of frustration. In many cases, the fix is pretty small: tighten permissions, clean up templates, or cut extra steps that slow people down.
The fastest path to adoption usually comes from a narrow rollout, role-based training, and quick changes early on.
FAQs
What should we do before going live?
Before you go live in Contractor Foreman, take care of the basics first.
- Set up your company details.
- Give people secure access by creating contacts, turning them into user accounts
- Assign the right roles
- Makw sure the credential emails were received
After that, get your project data and documents in order.
Double-check your templates and schedules, run role-based training for each team – including field crews – and line up support for the first few days after go-live.
How do we choose pilot users?
Pick two or three people from key parts of your operation, like a project manager, foreman, and office administrator. Bringing them in early helps build support for the change from day one.
It also helps to include a few tech-savvy champions who tend to pick up new tools fast and can help the rest of the team get comfortable. That way, you can collect feedback, deal with pushback early, and fine-tune the rollout before you put it in place across the whole company.
What causes low adoption after launch?
Low adoption after launch usually comes down to three things: team pushback, weak planning, and an implementation that feels like too much, too fast.
A lot of the time, the problem starts before the software even goes live. If people don’t understand why the change is happening, or leadership hasn’t built clear buy-in, they’re less likely to use the new system. Add poor communication and no structured training plan, and adoption can stall fast.
Another common mistake is turning on every feature at once. On paper, that may sound like a smart move. In practice, it can overwhelm users. When the system feels confusing, people tend to fall back on what they already know, like spreadsheets and other manual processes.
And if old workflows are still sitting there as an easy option, many team members will go right back to them instead of working in the new system.
Related Blog Posts
- How Role-Based Training Improves Software Adoption
- Want a more profitable construction business? Here’s the playbook
- Ultimate Guide to Construction Workflow Automation
- Construction Client Onboarding: Guide