
A new contractor named Peter is staring at the ceiling. His heart racing. He takes a deep breath, then another…
“Uhm, so we’re halfway done… and I just wanted to see if maybe we could talk about… you know… a partial payment?” he says.
He needs the money to cover payroll on Friday, pay for the next lumber delivery, and keep the electrician on schedule — or the whole project stalls.
“Of course!” the client says.
But then the client added, “Go ahead and send over the PROGRESS INVOICE tied to the original estimate.”
Peter freezes.
His invoices don’t match the estimate…because QuickBooks isn’t enabled for progress invoicing. No wonder he’s nervous about asking for money — even when he’s earned every dollar.
Don’t be Peter.
How?
By setting up progress billing correctly inside QuickBooks..
Progress billing lets you invoice clients in stages as work is completed, rather than waiting for the entire project to finish. It keeps cash flow steady, cuts down on mistakes, and makes you look far more professional.
Key Takeaways:
- What is Progress Billing? Invoicing based on milestones or completion percentages, commonly used in construction projects.
- Why Use QuickBooks? It links invoices to estimates, tracks profitability, and minimizes manual errors.
- Setup Essentials: Admin access, a detailed Schedule of Values (SOV), and a compatible QuickBooks version (Online Plus/Advanced or Desktop Premier/Enterprise).
- Key Steps: Enable progress invoicing, configure accounts and items, customize templates, and create detailed estimates.
- Additional Features: Retainage tracking, change order management, and specialized reports like “Estimates & Progress Invoicing Summary by Customer.”
QuickBooks simplifies progress billing, providing tools to manage cash flow, track project costs, and avoid overbilling. Paired with software like Contractor Foreman, it streamlines workflows and ensures accurate financial records.
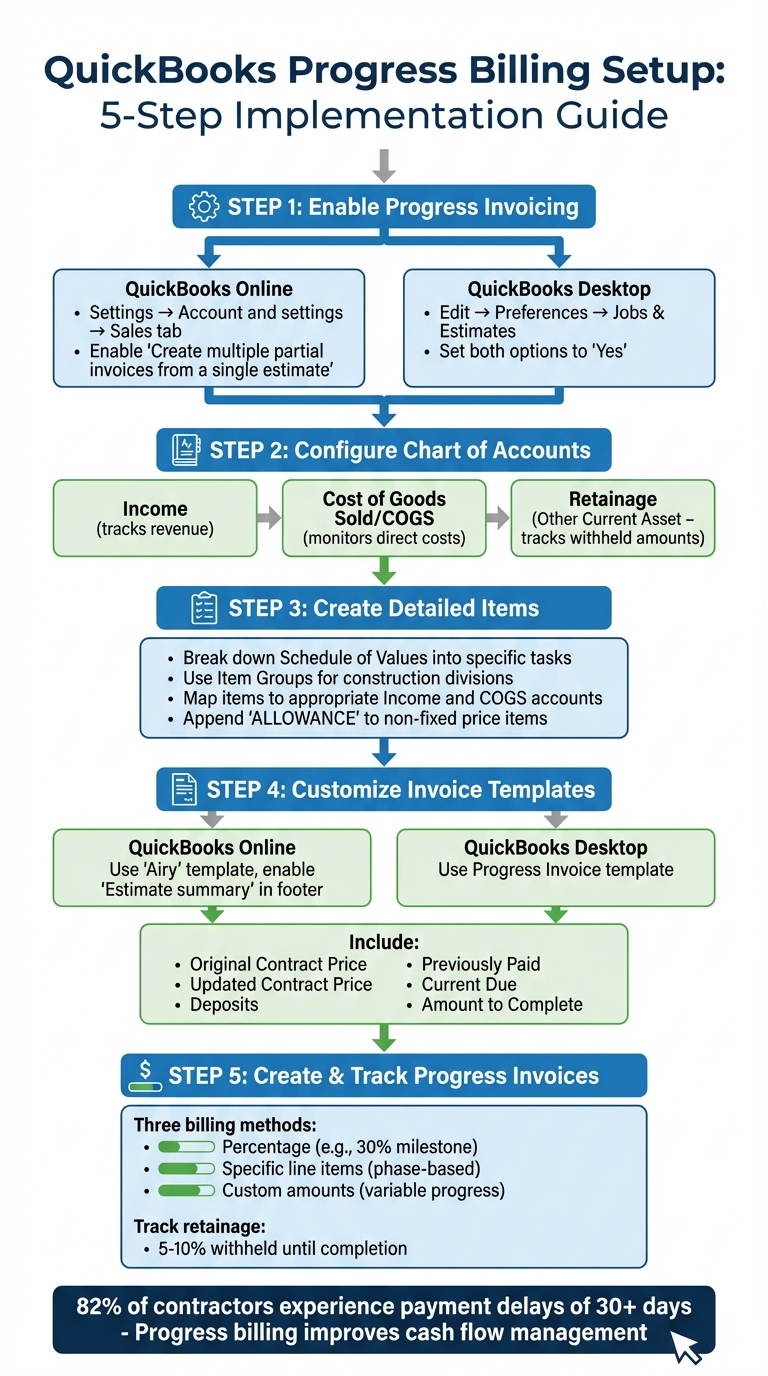
QuickBooks Progress Billing Setup: 5-Step Implementation Guide
Setting Up QuickBooks for Progress Billing
Getting QuickBooks ready for progress billing involves a few steps. While the process varies slightly between QuickBooks Online and Desktop versions, both require admin-level access to set everything up properly.
Turning On Progress Invoicing in QuickBooks
For QuickBooks Online users, start by logging in with admin credentials. Click the Settings (gear icon) in the top-right corner, then go to Account and settings. Under the Sales tab, find the Progress Invoicing section. Click Edit and enable the option labeled “Create multiple partial invoices from a single estimate.” If you don’t see this option, switch to Classic view by selecting + New > Classic.
For QuickBooks Desktop users, log in as an admin and switch to Single-user mode. Open the Edit menu, select Preferences, and navigate to Jobs & Estimates. Under the Company Preferences tab, set both “Do you create estimates?” and “Do you do progress invoicing?” to Yes.
Once progress invoicing is enabled, the next step is to align your Chart of Accounts and items with your billing milestones.
Configuring Chart of Accounts and Items
To keep construction finances organized, your Chart of Accounts should include specific categories for tracking income, costs, and retainage. Set up the following accounts:
- Income: Tracks revenue from construction projects.
- Cost of Goods Sold (COGS): Monitors direct costs, like materials and labor.
- Retainage: Set this up as an Other Current Asset to track withheld amounts.
For better job costing, create detailed line items that reflect each phase of your projects. Avoid generic descriptions – break down your Schedule of Values into specific tasks like foundation work, framing, electrical, and plumbing. In QuickBooks Desktop, you can use Item Groups to organize these tasks by construction divisions (e.g., “01 DIV General Requirements”). This setup makes milestone billing easier and provides subtotals for each phase on invoices. Be sure to map each item to the appropriate Income and COGS accounts. For categories with non-fixed prices, append “ALLOWANCE” to the item name to track them separately.
Adjusting Invoice Templates and U.S. Formats
After organizing your accounts and items, customize your invoice templates to meet U.S. billing standards.
In QuickBooks Online, go to Custom form styles and choose the “Airy” template or create your own. Click Edit, navigate to the Content tab, and check the box for “Estimate summary” in the footer section. This adds key details to your invoices, such as the total estimate amount, the amount invoiced to date, and the remaining balance – critical for U.S.-specific construction billing.
In QuickBooks Desktop, use the Progress Invoice template. For added clarity, manually include a footer section with details like:
- Original Contract Price
- Updated Contract Price (including Change Orders)
- Deposits Received
- Previously Paid Amounts
- Current Due
- Amount to Complete
QuickBooks automatically applies U.S. date formats (MM/DD/YYYY) and currency symbols ($), so no extra adjustments are needed for these.
Finally, confirm everything is working as expected by running the Estimates & Progress Invoicing Summary by Customer report. This will help ensure that the billed amounts and remaining balances are accurate and tracking correctly.
sbb-itb-5eea312
Creating and Managing Estimates for Progress Billing
Building Detailed Estimates
In QuickBooks, the estimate you create serves as your Schedule of Values (SOV) – essentially the backbone for all progress invoices.
To avoid confusion and disputes, break your project down into specific line items with clear cost codes, units (like square feet or hours), quantities, and rates. For example, instead of lumping everything under “Architectural Services”, list out each component separately, such as “Blueprints”, “Floor Plans”, and “Architectural Drawings.”
Each line item should include its cost code, unit of measurement, quantity, and rate. For instance, if you’re billing for concrete work, write something like “Foundation Pour – 2,500 sq ft @ $8.50/sq ft” instead of a vague “Foundation Work – $21,250.” This level of detail ensures transparency and makes it easier to create accurate progress invoices down the line.
Using Estimates to Generate Progress Invoices
Once your estimate is ready, mark it as “Accepted” (Online) or open it from the Customer Center (Desktop). From there, click “Create Invoice” or “Convert to invoice.” You can choose to bill by a percentage of the estimate, specific line items, or the exact quantities of work completed.
For example, if electrical work is 60% complete, you can invoice for 60% of the electrical line items while leaving plumbing at 0% until that phase starts. QuickBooks helps prevent overbilling by using the “Linked transactions” feature (Online) or the “Transactions” tab (Desktop), which tracks all related transactions. To keep invoices clean, enable the Desktop preference “Don’t print items that have zero amount” so customers only see the work that’s been completed.
Creating and Managing Progress Invoices
Creating Progress Invoices from Estimates
Once your estimate is approved, open it and click “Create Invoice” in QuickBooks Online or “Convert to Invoice” in the Desktop version. QuickBooks offers three billing options: invoice by a percentage of the total project (great for milestone-based billing, like 30% upfront), invoice for specific line items (ideal for phase-based work, such as charging only for completed materials or labor), or specify custom amounts for each line item.
For example, if your electrical work is 75% complete but the plumbing hasn’t started, you can bill 75% of the electrical line items and leave plumbing at 0%. QuickBooks keeps track of billed amounts using the “Linked Transactions” tab and alerts you if the billed amount exceeds the remaining balance.
| Billing Method | Best Use Case | QuickBooks Action |
|---|---|---|
| Percentage | Milestone-based projects (e.g., 30% upfront) | Select “Percentage of the total project” |
| Specific Line Items | Phase-based work (e.g., billing for “Materials”) | Choose “Only certain items” or “Specific line items” |
| Custom Amounts | Variable progress or partial labor hours | Enter specific dollar amounts or quantities per item |
To make invoices clearer for your customers, enable the “Estimate Summary” option in Custom Form Styles. This will display the total estimate, amounts already billed, and the remaining balance on the invoice. Additionally, don’t forget to track retainage for accurate financial records.
Tracking Retainage in Progress Invoices
Retainage, typically 5%–10% of each invoice, is withheld until the project is complete. Since this amount isn’t immediately collectible, it shouldn’t be recorded in your regular Accounts Receivable, as doing so could skew your aging reports.
To track retainage properly, set up a “Retainage Receivable” account in your Chart of Accounts under Other Current Assets. Then create a “Retainage” product or service item and link it to this account instead of an income account. When creating a progress invoice, add a “Subtotal” line item first, followed by the “Retainage” item entered as a negative number (e.g., -10%). This reduces the invoice total and moves the withheld amount to the Retainage Receivable account.
When the project is finished and the retainage is released, create a new invoice with the Retainage item entered as a positive number. This shifts the balance from the Retainage Receivable account back into Accounts Receivable, making the funds collectible. To keep track of retainage owed by each customer, run a QuickReport from your Retainage Receivable account and filter it by Customer or Job. Once retainage is managed, update your estimate to include any change orders before billing for additional work.
Processing Change Orders
For any construction change orders, update the original estimate before billing for the added work. QuickBooks won’t let you bill beyond 100% of the estimate total unless the baseline estimate is adjusted. Add change orders as new line items, such as “Change Order #1 – Additional Electrical Outlets”, and include the quantity, rate, and total cost.
These new line items or price adjustments will automatically appear in the “How much do you want to invoice?” window when creating your next progress invoice. Be sure to save the updated estimate before clicking “Create Invoice”, so the change order amounts are ready for billing. The “Estimates & Progress Invoicing Summary by Customer” report will show how change orders have impacted the total project value and the percentage billed so far.
For added convenience, tools like Contractor Foreman can sync cost codes with QuickBooks. This integration ensures change orders tracked in your project management system automatically flow into your financial records, eliminating double data entry and keeping your Schedule of Values accurate as the project evolves.
Reviewing Financial Data and Generating Reports
Once you’ve set up progress invoices, keeping a close eye on your financial data is essential to maintain accurate billing and steady cash flow.
Key Reports for Progress Billing
QuickBooks integrations offer several reports to help you track billing progress and anticipate cash flow challenges. For example, the Estimates & Progress Invoicing Summary by Customer report in QuickBooks Online, or the Job Progress Invoices vs. Estimates report in QuickBooks Desktop, provides a clear view of billed totals, invoicing percentages, and remaining balances. If you’re using QuickBooks Online, you can customize the report by opening it, clicking Customize, selecting Change columns, and checking options like Invoiced Amount, % Invoiced, and Remaining Amount.
Other helpful reports include:
- Job Profitability: Tracks project profitability as work progresses.
- Estimates vs. Actuals: Compares projected costs to actual expenses, highlighting any variances.
- Unbilled Costs by Job: Identifies costs that have been incurred but not yet invoiced, which can directly affect your cash flow.
These reports are especially important when you consider that 82% of contractors experience payment delays of 30 days or more, underscoring the importance of timely and accurate invoicing. Together, these tools provide a comprehensive view of your financial standing, bridging the gap between invoicing and financial management.
Reconciling Billed Amounts and Retainage
Using these reports, you can reconcile invoiced amounts with your Schedule of Values, which breaks down labor, materials, and overhead costs. This ensures that the amounts you’ve billed align with the percentage of work completed. For retainage, you can run the Open Balances by Customer and Project report, filtering it by your “Retainage Receivable” account to confirm that withheld amounts match your project terms.
QuickBooks Enterprise users have the option to automate retainage calculations in Preferences, but if you’re using other versions, you’ll need to track retainage manually by adding a negative line item.
Solving Common Issues
If the “How much do you want to invoice?” pop-up doesn’t appear when converting an estimate, try switching to the “Old layout” in QuickBooks Online to access progress invoicing features. Additionally, check the “Linked Transactions” section on each invoice to confirm it’s tied to the correct estimate. If an estimate won’t convert to an invoice, verify that its status is marked as “Accepted” – not “Pending” or “Rejected”. Resolving these issues promptly ensures your progress billing stays on track and avoids unnecessary delays.
Conclusion
Using QuickBooks for progress billing involves a few key steps: activating the feature in your account settings, creating detailed construction cost estimates with clear line items, customizing invoice templates to reflect estimate summaries, and issuing progress invoices as work is completed. These practices not only help you collect payments at specific milestones, but they also improve cash flow management.
But the benefits go beyond faster payments. Progress billing minimizes the risk of nonpayment, keeps clients informed about how their money is being allocated, and offers real-time insights into your financial standing. With reports like the “Estimates & Progress Invoicing Summary by Customer”, you can monitor how much has been invoiced versus what remains, ensuring you never exceed the total estimate amount.
For construction contractors, progress billing becomes even more efficient when paired with specialized software. Tools like Contractor Foreman integrate with QuickBooks to handle complex features such as retainage tracking, change orders, and AIA-style billing (G702/G703). This integration syncs invoices, payments, and bills between the field and office, reducing duplicate entries and cutting down on administrative errors. Features like one-click conversions from estimates to invoices and automated retention calculations allow you to spend less time on paperwork and more time focusing on your projects.
It’s also worth noting that support for older versions of QuickBooks Desktop has ended, making QuickBooks Online the preferred choice for seamless integration with modern project management tools. Whether you’re billing by percentage of completion or individual line items, the right system ensures your progress billing stays accurate, organized, and profitable.
FAQs
How can progress billing help manage cash flow more effectively?
Progress billing is a smart way to manage cash flow by invoicing clients at specific project milestones. Instead of waiting until the entire project is finished, you can receive payments as work progresses. This method aligns incoming payments with ongoing expenses, easing the burden of covering costs upfront and keeping your cash flow steady throughout the project.
It’s especially useful for long-term or large-scale projects, as it reduces payment delays and provides better financial predictability for both you and your clients.
How does progress billing work in QuickBooks Online versus QuickBooks Desktop?
In QuickBooks Online, you can enable progress billing by navigating to Settings → Account and Settings → Sales. Once activated, you can create partial invoices directly from cloud-based estimates. This makes managing ongoing projects straightforward and efficient.
For QuickBooks Desktop, progress billing is enabled in the Jobs & Estimates preferences. However, you’ll need to switch to single-user mode to turn this feature on. Afterward, partial invoices can be created from estimates using options in the File or Edit menus.
Both versions offer progress billing, but the experience differs. QuickBooks Online provides a modern, cloud-based workflow, while QuickBooks Desktop sticks to a more traditional, menu-driven setup.
How do I track retainage in QuickBooks when using progress billing?
To effectively track retainage in QuickBooks during progress billing, set up a dedicated Retainage Receivable account. When creating a progress invoice, assign the retainage amount to this account. You can do this by using a journal entry or leveraging a QuickBooks discount item as an alternative method. This setup allows you to monitor the retainage balance easily through aging reports or custom financial reports, ensuring everything stays organized and transparent.