
“But I worked Saturday, didn’t I?”
“Wait, wait… why’s my overtime showing regular rate?”
“I did four different jobs this week. This can’t be right.”
Payroll is one of those things that — when not done right, even for just a couple of pay periods — can quietly wreck your bottom line and your crew’s trust in you.
Why?
MONEY is personal. And you can’t afford to mess with the people who are loyal to you.
And with 53% of construction companies facing payroll compliance penalties in the last five years, it’s not just a trust or money problem — it’s a compliance one too.
The solution is easy: Integrate.
Set it up right once, and payroll stops being something you have to think about.
Four things to prioritize:
- Map the data: jobs, employees, pay rates, cost codes, and GL links
- Set pay rules: overtime, prevailing wage, fringe benefits, multi-rate work, apprentices, per diem, and travel time
- Test before launch: run a parallel payroll using live job cases and fix sync errors, duplicate records, and rounding gaps
- Lock audit controls: payroll registers, WH-347 reports, edit logs, zero-hour filings, retention rules, and post-launch edit tracking
This checklist is about one goal: making sure approved field hours flow into payroll and accounting without hand-fixing every pay period.
It also helps keep labor cost data lined up with what you pay, what you bill, and what you may need to show in an audit.
The 4-step payroll integration process:
| Step | What to check: | Why it matters: |
|---|---|---|
| 1 | Data owners, IDs, cost codes, employee classes | Stops duplicate records and bad job costing |
| 2 | Wage rules, fringes, approvals, edit tracking | Cuts pay errors and compliance risk |
| 3 | Parallel payroll, exception logs, reconciliations | Finds setup gaps before live payroll |
| 4 | Reports, record locks, retention, launch owners | Keeps payroll files ready for review |
If your crews work across public and private jobs, union and non-union work, or more than one state, the setup needs to handle all of that from day one. Otherwise, the manual fixes come back fast.
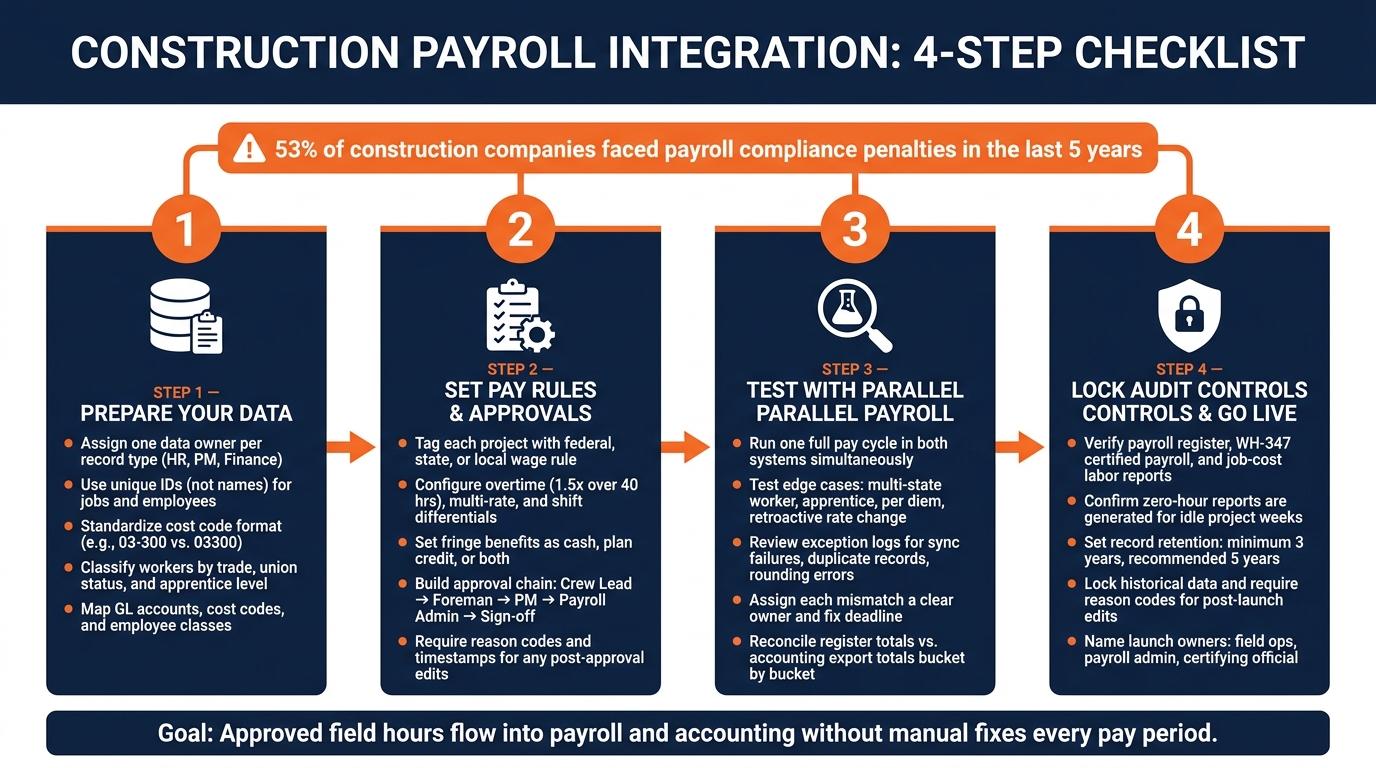
Construction Payroll Integration Checklist: 4-Step Setup Guide
Checklist Step 1: Prepare Your Payroll Data Before Setup
Once you’ve set the scope, lock the data model before you touch configuration.
- Each data type needs one clear owner.
- Payroll/HR should own employee records.
- PM/accounting should own jobs.
- Job costing should own cost codes.
- If two systems can create the same record, you usually end up with duplicates and quiet data drift.
Map Jobs, Employees, Pay Rates, and Cost Codes
Use unique IDs, not names, for jobs and employees to avoid duplicates and naming drift.
Set your job and cost code format before setup starts, including dashes and leading zeros, so codes like “03-300” and “03300” don’t wreck job costing. If a job shows up as “Oak Ridge Apts” in the field app and “OakRidge-2” in accounting, those records won’t match and can lead to unknown labor entries.
| Data Object | Required Fields | Source of Truth |
|---|---|---|
| Employee | Name, ID, Address, Work Location, Class | Payroll / HR |
| Job / Project | Job ID, Name, Status, Location | PM / Accounting |
| Cost Code | Code ID, Description, Phase | Job Costing |
| Compensation | Base Rate, OT Rules, Fringe Benefits | Payroll |
| Accounting | GL Accounts (Expense/Liability), Classes | Finance |
After the field map is set, classify workers the same way across every system.
Set Up Employee Classes and Labor Categories
Define each class your crews fall into by trade, crew, union status, and journeyman/apprentice level so prevailing wage and fringe calculations stay in sync.
If someone is logged as a generic “Laborer” instead of the right trade classification, that can turn into a compliance problem on prevailing wage jobs.
The DOL cares about the work performed, not the internal title.
Unregistered apprentices must be paid the full journeyworker rate.
Consistent classifications also help keep labor burden calculations – which often add 35% to 65% on top of base wages in construction – tied to the right cost buckets on their own, instead of forcing manual fixes later.
These classifications feed the pay rules and approval checks in the next step.
sbb-itb-5eea312
Checklist Step 2: Set Up Pay Rules and Approval Steps
Set up pay rules and approvals so clean time data flows into payroll without manual fixes. Once the data model is set, the next job is putting the right rules and review steps around it.
Set Up Prevailing Wage and Fringe Benefit Rules
Start by tagging each project with the right wage rule: federal, state, or local. Then pull the correct wage determination for the project’s county and construction type – Building, Heavy, Highway, or Residential. Use the current modification date.
From there, match each classification to the work actually performed. If one employee handles more than one role, split the hours by role. That step matters more than it may seem. If a worker does higher-rate work for part of the day, lumping all hours together can create pay errors fast.
Handle fringe benefits with the same level of care. Record whether fringes are paid as cash, benefit-plan contributions, or a mix of both. Check apprentice registration and confirm the required ratio. For union work, record the pay items, deductions, and classifications required under the agreement.
| Pay Rule Category | Configuration Requirement | Compliance Impact |
|---|---|---|
| Overtime | 1.5x base wage for hours over 40 in a workweek | Prevents CWHSSA violations |
| Fringe Benefits | Cash vs. plan credit allocation per worker | Ensures total compensation meets prevailing wage |
| Shift Differentials | Configure by specific time windows or scheduled shifts | Applies premium pay automatically |
| Multi-Rate Pay | Split hours by task and cost code | Prevents underpayment for higher-skilled tasks |
| Apprentices | Percentage of journeyworker rate | Requires proof of registration to avoid full-rate penalties |
| Travel Time / Per Diem | Separate earning codes with approval prompts | Maintains audit-ready documentation for special pay |
Once those pay rules are in place, lock down the approval chain that protects them.
Build an Approval Chain from Field Time to Payroll Review
A clean approval chain should move from field entry to final payroll sign-off:
- Employee / Crew Lead → Foreman / Superintendent – captures hours, job codes, and cost codes at the end of each shift. The foreman reviews classification accuracy, task-based rates, overtime triggers, and coding errors.
- Project Manager / Operations – handles late approvals or changes to job allocations after field review.
- Payroll Admin / Finance – checks wage determinations, fringe credits, deductions, and garnishments.
- Final Sign-off – signs off on the Statement of Compliance, tied to the payroll register and time records.
Flag exceptions at the supervisor review stage – missed punches, wrong job codes, break issues, and rate changes. This is the best point to catch problems before they spill into payroll.
Post-approval edits are a danger zone. Any manual change to the payroll register after approval should create an audit trail with a reason and timestamp. If someone changes a rate, reassigns hours, or fixes a code after sign-off, there needs to be a clear record of what changed and when.
Set hard cutoffs and send automated reminders 24 hours before the approval deadline. If a foreman misses the window, the system should escalate it to the project manager automatically.
After approvals are set, test the full flow against actual job data before go-live.
Use Connected Construction Workflows Where Relevant
Contractor Foreman can connect GPS timecards, daily logs, and accounting syncs so approved hours move into payroll without re-entry. Approved hours should pass straight into accounting.
Checklist Step 3: Test the Integration Before Go-Live
Run at least one full pay cycle in parallel before go-live.
Run a Parallel Payroll Using Real Job Scenarios
Use real job records so the test mirrors what happens in the field, not a cleaned-up sample.
Process the same pay period through both systems, then compare total hours, overtime, multi-rate splits, and job allocations.
Include scenarios that reflect the messiness of actual payroll. Test:
- A worker splitting time across two trades
- A multi-state employee
- Overtime under FLSA and CWHSSA
- A prevailing wage job with benefit-plan contributions versus cash fringes
- One apprentice
- One per diem case
- One retroactive rate change
For each case, confirm that gross pay, fringe benefit credits, labor distribution by cost code, and overtime calculations match what you expect. Start with one dependable crew and supervisor first. That gives you a cleaner pilot before you roll the test out to more people.
Once those scenarios reconcile, move to the exception logs.
Review Exception Logs and Fix Data Mismatches
Review exception logs right after the parallel run. This is where the integration usually shows its weak spots: failed syncs, missing employee IDs, inactive cost codes, and duplicate records are common problems.
Start with rounding mismatches. Two systems can treat piece-rate or weighted-average overtime a little differently, so small gaps can show up fast during testing. Give each mismatch a clear owner and a fix date before go-live.
| Exception Type | What to Check | Owner |
|---|---|---|
| Sync failure | Employee ID exists in both systems and is formatted identically | Payroll Admin |
| Inactive code | Code is active in the accounting system and mapped correctly | Project Manager |
| Missing fields | Class, location, or department fields are populated instead of defaulting to blank | Finance |
| Rounding error | Overtime and multi-rate calculations match between systems | Payroll Admin |
| Duplicate record | No employee appears twice with different IDs or pay rates | HR / Payroll Admin |
Run one final reconciliation. Compare payroll register totals to accounting export totals bucket by bucket: gross wages, employer taxes, deductions, and net pay. When the register and export totals tie out, confirm the audit reports and go-live controls in the next step.
Checklist Step 4: Confirm Audit Reports and Go-Live Controls
When the parallel payroll run lines up, use this final check to make sure your reports are set and your launch controls are tight. Before the first live payroll run, confirm each report is ready, every owner is named, and records can stand up to an audit.
Verify Payroll Registers, Certified Payroll, and Labor Audit Reports
Run each report and compare it with your source data before go-live. The payroll register should match gross pay, deductions, tax withholdings, fringe benefits, and net pay against approved time records. The job-cost labor report should show labor by job, phase, cost code, crew, and pay period. If you handle federal work, make sure Form WH-347 generates the right way, along with any state form you need.
| Report Type | Key Data to Verify | Purpose |
|---|---|---|
| Payroll Register | Gross pay, deductions, net pay, tax withholdings | Internal accuracy and tax compliance |
| Certified Payroll (WH-347) | Worker name, classification, daily hours, fringe benefits | Required for federal government-funded projects |
| Job-Cost Labor Report | Labor hours and burden by job, phase, cost code, crew, and pay period | Project profitability and bidding accuracy |
| Fringe Benefit Support | Bona fide plan credits, cash-in-lieu payments, or a combination | Prevailing wage audit-ready records |
| Exception/Audit Log | Edit logs, change logs, missed punches, approval history | Audit-ready records |
Check one more thing before launch: the system should also produce zero-hour reports for weeks when a covered project is idle. That keeps certified payroll filings in order. Skip a week – even a zero-hour week – and you can end up with an audit problem.
Before releasing payroll, review the audit file against:
- wage determination
- worker classification
- hours
- rates
- fringe treatment
- apprenticeship status
- deductions
- project coding
Each item should match what the system will pay and report.
Once the reports tie out, lock the records and name the people who own launch.
Set the Go-Live Date, Record Retention Rules, and Launch Owners
Set a go-live date, then lock historical data so nobody can change records from the old system unless there’s a documented reason. Every post-launch edit should require a reason code and a timestamp.
Keep payroll records for at least 3 years after project completion. A 5-year retention policy is a safer choice because it helps cover state rules and audit timelines. Store everything in one searchable digital system, organized by job, employee, and pay period.
Ownership should be clear before launch. Field operations handles time capture, job coding, and worker classifications. Payroll handles pay rates, tax rules, fringe calculations, and deductions. The certifying official signs the Statement of Compliance only after all exceptions are cleared.
FAQs
What should I map before setting up payroll integration?
Before setting up payroll integration, map the key data points you need for smooth automation and compliance:
- Worker classifications tied to project wage determinations
- Project, phase, and cost codes
- Pay rates, fringe benefit obligations, and union deduction rules
This step helps make sure labor hours, wages, and deductions sync to the right jobs. It also supports prevailing wage requirements, which is where small setup mistakes can turn into a big headache later.
How do I handle prevailing wage and multi-rate pay correctly?
Track hours for each project by job classification, task, and location. Prevailing wage includes two parts: a base hourly rate and a fringe benefit amount. That means total pay has to meet the required rate for each task performed.
If a worker handles more than one trade during the same pay period, log those hours under the right classification and pay the matching rate for each one. Also, check the wage determination document in your contract every time. Rates can change based on county, construction type, and trade.
What reports should I verify before going live?
Before going live, verify that your certified payroll reports line up with your payroll, time, and project records. That check helps you catch errors early and stay ready for an audit.
Make sure the report matches your payroll register, official time records, wage determinations, fringe benefit support, deduction records, the signed Statement of Compliance, and job code mapping. Your payroll outputs should also reconcile with the general ledger without manual intervention.