
- Step 1: Collect Project Details and Past Project Data
- Step 2: Use Digital Tools for Takeoffs and Measurements
- Step 3: Calculate Material and Labor Costs with Current Pricing
- Step 4: Build Complete Estimates Using Construction Software
- Step 5: Review, Adjust, and Share the Estimate
- Step 6: Compare Actual Costs to Estimates for Better Future Accuracy
- Conclusion
- FAQs
There are two types of contractors: the ones who confidently say, “This should cost around…” and the ones who’ve learned the hard way never to finish that sentence.
Because the moment you say a number out loud, the construction gods immediately take it as a challenge.
Materials come in higher.
Labor takes longer.
That “small buffer” disappears almost immediately—and suddenly you’re back to explaining numbers that don’t add up.
This isn’t rare, though. In fact, it’s the norm.
Here’s what the numbers say:
- 86% of construction projects go over budget, with overruns averaging 28%
- 80% of those overruns come from inaccurate estimates
- Outdated methods—spreadsheets, manual calculations, gut feel—are still one of the biggest reasons why
Why does this happen?
It’s not because contractors are trying to game the system to win a project. It’s because estimating still gets treated like a mix of guesswork, optimism, and trying to impress—when it should be grounded in actual data, not gut feel.
Platforms like Contractor Foreman simplify estimating, reduce errors, and ensure projects stay on budget.
Key Steps to Build Accurate Estimates:
- Gather detailed project requirements and past project data.
- Use digital tools for precise measurements and takeoffs.
- Calculate material and labor costs using current market prices.
- consolidate estimates with construction management software for home builders for accuracy.
- Review, adjust, and share estimates professionally.
- Compare actual costs to estimates for continuous improvement.
Because the difference between a project that stays on track and one that quietly drains your profit?
It usually starts with the number you wrote down at the very beginning.
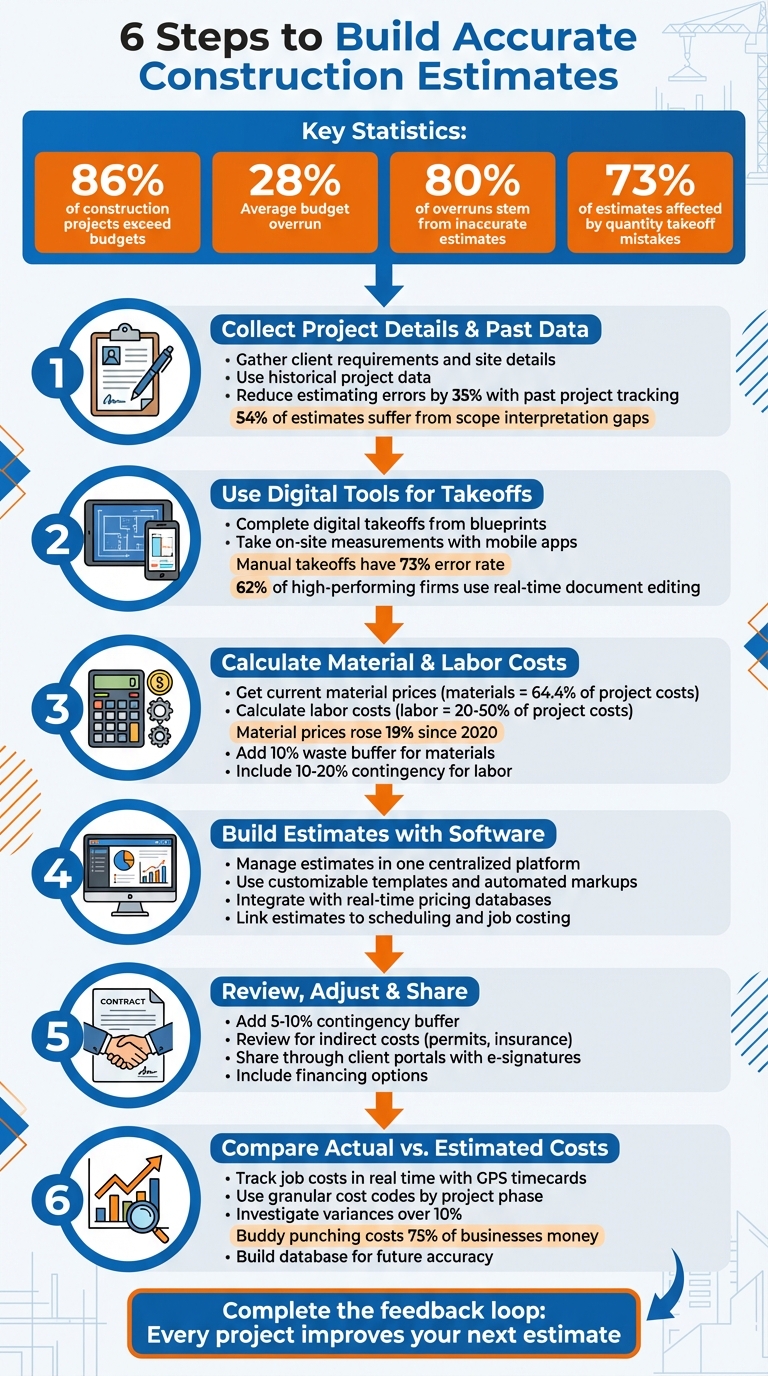
6 Steps to Build Accurate Construction Estimates for Residential Contractors
Step 1: Collect Project Details and Past Project Data
Getting accurate estimates starts with gathering all the right information.
Did you know that 73% of construction estimates are affected by quantity takeoff mistakes, and 54% suffer from gaps in scope interpretation? These issues often arise when contractors rush through the initial data collection or work with incomplete details.
Gather Client Requirements and Site Details
Start by documenting every aspect of the project scope.
This includes design preferences, finish levels, and timelines. Measure every dimension on-site – walls, rooms, ceiling heights, and key structures – using feet and inches. Don’t forget to note practical details like site access, staging areas, utility locations, or anything that could impact material delivery or equipment placement.
For renovations, dig deeper. Look for hidden problems such as structural damage, outdated wiring, or water issues that might not show up on blueprints. Also, review local ordinances, HOA guidelines, and permit requirements, as these can unexpectedly raise costs or delay progress. Zoning restrictions and other external factors should also be documented carefully.
This groundwork ensures you have a strong foundation to incorporate insights from past projects.
Use Past Project Data
Pair your site-specific data with insights from previous projects. Instead of relying on generic averages, analyze your own historical records to estimate labor hours, material needs, and crew productivity. Contractors who track actual versus estimated costs for every project can reduce future estimating errors by 35%.
Look for patterns in past projects. For instance, maybe you consistently underestimate drywall installation time or overorder lumber. Adjust your estimates to reflect these lessons. Tools like Contractor Foreman can help you access detailed records, including actual costs, material waste, and change orders, to refine your predictions.
As ConstructionBids.ai puts it:
“Historical data analysis is the single highest-impact accuracy improvement”.
sbb-itb-5eea312
Step 2: Use Digital Tools for Takeoffs and Measurements
Relying on manual methods – like paper blueprints, scale rulers, and calculators – for takeoffs can lead to mistakes. In fact, manual takeoffs have a staggering 73% error rate, often caused by misreading scales or double-counting measurements. Digital tools offer a smarter, more reliable alternative.
Complete Digital Takeoffs
Cloud-based takeoff software simplifies the process by letting you extract measurements directly from digital blueprints. With drag-and-drop functionality, these tools handle calculations automatically, speeding up your workflow and reducing human error.
For example, Contractor Foreman’s Drawings & PDF Markup feature allows you to interact with blueprints digitally. You can extract measurements, annotate plans, and even integrate with tools like Kreo Takeoff to automate complex calculations. Color-coded digital markups further minimize errors by ensuring each measurement is counted only once.
Using specialized software for error checking and report generation can streamline these processes, reducing human error and increasing efficiency. These tools include features that automatically flag potential issues, allowing for quick corrections.
To keep everyone on the same page, store blueprints in Contractor Foreman’s Files and Photos feature. This ensures your team always works with the most up-to-date plans – a critical step, as 62% of high-performing construction firms rely on real-time document editing and version control to avoid errors caused by outdated drawings.
By leveraging digital precision, you can lay a strong foundation for accurate construction estimates. Once you’ve completed your digital takeoffs, the next step is to verify these numbers in the field.
Take On-Site Measurements
Digital tools are excellent for analyzing plans, but on-site verification is essential to account for real-world conditions. Blueprints can’t capture every detail, so during site walkthroughs, use your mobile device to document factors like soil quality, access limitations, or structural challenges that could impact material needs or labor estimates.
Contractor Foreman’s mobile app makes this process seamless. You can record measurements, take photos, and complete digital checklists directly from the job site, with all data syncing to the cloud. This eliminates errors caused by manual data entry. Notably, 76% of contractors who use commercial software for data collection report higher satisfaction compared to those relying on paper forms.
Always cross-check software-generated quantities with on-site measurements. For instance, if your digital takeoff calculates 1,200 square feet of flooring but the actual space differs, catching that discrepancy early can save you from costly mistakes. These real-time adjustments ensure your estimates remain accurate and your budget stays on track.
Step 3: Calculate Material and Labor Costs with Current Pricing
Once your project data is verified, the next crucial step is pricing materials and labor accurately. Materials now make up 64.4% of total project costs, while labor accounts for 20% to 50%. Even small pricing errors can derail your budget. Since 2020, construction material prices have risen by an average of 19%, with 82.5% of materials seeing major price increases. In such a volatile market, relying on outdated price lists is a surefire way to blow your budget.
Get Current Material Prices
Utilize live supplier databases to keep your material costs up to date. By linking your construction finance software to supplier feeds, you can ensure that takeoff quantities reflect current market rates automatically. Additionally, request direct quotes from multiple vendors for project-specific materials. This allows you to compare prices and secure the best value while maintaining quality. Don’t forget to factor in hidden costs like sales tax, freight, and delivery fees – these can significantly impact your total material expenses. To avoid over-ordering, apply a 10% waste buffer to account for cutting, damage, or site-specific conditions.
Tools like Contractor Foreman send automated price alerts when material costs spike or vendor quotes expire, giving you the chance to adjust estimates proactively. Integrating with QuickBooks enables you to compare current supplier quotes with past purchases, making it easier to spot price increases immediately.
A real-time cost database can help you estimate more accurately… With real-time data, you can update your estimates to reflect current market conditions, avoid budget overruns, and keep your project financially stable.
Calculate Labor Costs
Pricing labor demands the same level of precision as materials.
Start by researching local wage rates for your area. Be sure to include all associated labor costs, such as payroll taxes (FICA at roughly 7.65%), workers’ compensation (1–7%), unemployment insurance (2–6%), and benefits packages (20–30%).
Project complexity also plays a big role in labor estimates. For instance, while standard rooms are straightforward, features like cathedral ceilings or irregular layouts can increase labor requirements by 40–80%. To safeguard your budget, include a 10–20% contingency for overtime, weather-related delays, or worker absences. With 81% of U.S. construction firms raising wages and 26% enhancing benefits packages, staying informed on wage trends is critical to competitive bidding.
Tools like Contractor Foreman simplify labor tracking with digital time cards and real-time dashboards, helping you spot budget variances immediately. QuickBooks integration further streamlines this process by syncing labor data, allowing you to detect and address budget leaks as they happen.
Marshall Hargrave, writing for QuickBooks, emphasizes the importance of tracking against your budget baseline:
“The ‘control estimate’ serves as the officially approved budget baseline. As your company purchases materials, it must track actual expenses against this baseline to identify any deviations.”
Step 4: Build Complete Estimates Using Construction Software
Once you’ve gathered precise material and labor costs, the next step is to pull everything together into a detailed estimate using construction software. These tools help eliminate errors and keep all your project data in one place, reducing the risk of budget overruns. A centralized platform ensures that your estimates are accurate, accessible, and ready to support smooth project execution.
Manage Estimates in One Place
With Contractor Foreman, you can streamline your estimating process using customizable templates, automated markups, and professional proposals that include logos and project photos. The platform integrates with 1build to pull real-time material and labor prices, ensuring your estimates reflect current market rates. This unified system allows estimates to flow seamlessly into other project phases, linking scheduling, work orders, and daily logs.
Chuck A. from Liercke Construction, LLC highlights the benefits of this integration:
“The integration of the whole platform is very good, including externally with QuickBooks Online. Ability to do time sheets in the field without separate software. Cost codes and cost items that can be used for different jobs, this is huge for us.”
The platform also notifies you when clients review estimates and offers client financing options. Daily logs tie on-site progress back to the original estimates, making it easier to identify and address any budget discrepancies quickly.
Once your estimates are consolidated and professionally presented, you can scale the platform to fit your team’s size and needs.
Choose Plans Based on Team Size
Contractor Foreman offers flexible pricing plans designed to grow with your business.
Choose from five tiers:
- Basic: $49/month for one user
- Standard: $79/month for three users
- Plus: $125/month for eight users (a favorite among growing residential contractors)
- Pro: $166/month for 15 users
- Unlimited: $249/month for unlimited users
All plans include unlimited projects and storage, giving you predictable costs without surprises. With an average support wait time of just 13 seconds and a 4.5/5 star user rating, Contractor Foreman ensures you’re not only equipped but also supported every step of the way.
Step 5: Review, Adjust, and Share the Estimate
After pulling together all your data into a detailed estimate, the next step is to review and refine it. This step is critical – it protects your profit margins and builds trust with your clients. A careful review ensures you catch overlooked indirect costs, like permits or insurance, and correct any errors, such as typos or missing items in your calculations.
Add Contingency Buffers
Including a 5-10% contingency buffer in your residential estimates can save you from financial headaches when unexpected costs pop up. This buffer helps cover surprises like hidden site conditions, weather delays, material price changes, or last-minute client requests. Without it, you might end up absorbing these extra expenses yourself.
To calculate this buffer wisely, lean on historical project data. Factor in your risk assessment for the job, and consider any known high-cost risks specific to the project. Document every contingency expense during the project to improve future estimates and set clear rules for when these funds can be used.
Once you’ve polished your estimate, it’s ready to be presented to the client.
Share Estimates Through Client Portals
Using tools like Contractor Foreman’s client portal can simplify how you present and share estimates with homeowners. This platform allows you to create professional proposals that include your company logo and project photos, while also offering real-time notifications so you can see when clients open and review your estimate.
Clients can approve estimates digitally with electronic signatures and timestamps, cutting down on the back-and-forth of emails or texts. Vicky V. from Sycon, LLC highlights the benefits of this approach:
“Everything is in one place, and the entire team can see the same data at the same time. No more paper estimates, schedules, change orders, time tracking, etc. It is all online.”
The portal also integrates financing options directly into your estimates, making it easier to secure larger residential projects while maintaining full transparency with your clients.
Step 6: Compare Actual Costs to Estimates for Better Future Accuracy
Once you’ve shared your detailed estimate, the next step is to measure its accuracy by comparing actual costs with your projections. Tracking job costs can reveal that you might underprice work by as much as 5–15%, which often forces you to absorb overruns – a common issue in 86% of projects. This isn’t just about correcting past errors; it’s about creating a feedback loop that sharpens future bids and boosts profitability.
Track Job Costs as Work Progresses
Keeping an eye on costs in real time allows you to address overruns before they spiral out of control. Tools like Contractor Foreman’s job costing features provide a live comparison of actual expenses versus your original estimate throughout the project.
For labor, GPS-enabled timecards ensure accurate tracking. This eliminates “buddy punching”, where one employee clocks in for another – a practice that costs 75% of U.S. businesses money. For example, in a 100-person crew, if 16% of workers buddy punch by just 15 minutes daily, you could lose around $62,400 annually. GPS geofencing ensures that workers are physically on-site before clocking in, providing reliable data for future estimates.
Using granular cost codes to break down labor hours by project phase – such as rough-in, trim-out, or foundation work – lets you pinpoint which tasks are eating into your margins. Additionally, track loaded labor rates, which account for taxes, insurance, and benefits. A worker earning $25/hour may actually cost between $35 and $42 per hour. Overlooking these details is a quick way to underprice your work.
It’s also important to track change orders separately. This helps you determine whether cost variances are due to scope changes or productivity issues. By integrating change orders into your financial tracking, you gain a complete picture of how actual costs compare to your initial estimate.
These insights aren’t just for the current project – they’re essential for refining future bids and reducing cost variances.
Improve Future Estimates with Project Data
Combining real-time cost tracking with post-project analysis creates a continuous improvement cycle for your estimates. After wrapping up a project, conduct a variance analysis using historical data to refine cost categories and adjust pricing formulas when variances exceed 10%.
For instance, if bathroom remodels consistently run 12% over budget, you’ll need to revise your pricing formula to reflect this. Break down spending into key categories like direct materials (typically 25–40% of job revenue), direct labor (20–35%), allocated overhead (15–25%), and net profit (ideally 15–25%). If these percentages stray from your targets, you’ll know exactly where adjustments are needed.
Set a protocol to investigate any cost variance over 10% to identify whether the issue stems from factors like weather delays, inaccurate estimates, or crew inefficiencies. Additionally, review vendor and subcontractor performance as part of your analysis. Identifying suppliers who contribute to delays or unexpected price hikes allows you to fine-tune future estimates.
The ultimate goal? Build a database of real-world costs that replaces guesswork with solid numbers, ensuring every estimate you create is more precise than the last.
Conclusion
Creating accurate construction estimates isn’t just about crunching numbers – it’s about following a structured process. By combining historical data, digital tools, and real-time tracking, you can set the foundation for success. Start with detailed project requirements, leverage digital takeoffs, use up-to-date pricing, and integrate tools like Contractor Foreman to streamline everything from bidding to final invoicing.
Here’s a reality check: 86% of projects go over budget, with an average overage of 28%. But this doesn’t have to be your story.
Using integrated software that connects estimates with schedules, job costing and change orders can eliminate surprises and strengthen client relationships.
This kind of system not only keeps costs under control but also shows your clients that transparency is a top priority.
Accurate estimates do more than protect your profit margins – they build trust. Detailed, transparent breakdowns demonstrate that you’re planning carefully and responsibly.
The real game-changer? Completing the feedback loop. By comparing actual costs to your estimates after each project, you can move from educated guesses to precise, data-driven bids. Every project becomes a stepping stone to more accurate future estimates.
No matter the size of your team, the formula is the same: collect thorough data, use current pricing, track every dollar, and learn from past projects. Commit to this cycle of improvement, and you’ll refine your bidding process while consistently delivering on your promises – every time.
FAQs
What should I include in my estimate besides materials and labor?
When estimating costs, don’t forget to include indirect costs, change order tracking, and a contingency or markup.
- Indirect costs cover things like permits, insurance, overhead, and project management – expenses that aren’t tied directly to materials or labor but are essential to completing the project.
- Change order tracking ensures that any adjustments to the project scope are properly documented and reflected in the budget.
- Finally, adding a contingency or markup provides a cushion for unexpected expenses, helping to minimize the risk of going over budget.
These elements are crucial for creating a more accurate and reliable project estimate.
How often should I update material and labor prices before bidding?
To keep your estimates accurate, it’s essential to refresh material and labor costs at least once a week – or more often if there are major shifts in the market. Prices can change quickly, and using outdated information could lead to profit losses. This practice is particularly critical in unpredictable markets or for projects scheduled well into the future. Regular updates ensure your numbers stay precise and your profit margins remain secure.
How do I use actual job costs to improve my next estimate?
To make your next estimate better, take time after each project to compare the actual job costs – things like materials, labor, and overhead – with what you originally estimated. This comparison helps you spot any differences, fine-tune your pricing, and improve accuracy for future projects. By reviewing this data regularly, you can create a solid historical record that supports more accurate, data-backed predictions for future bids. This approach reduces mistakes and boosts profitability.