
- Here are the steps to make onboarding efficient (and easy) for you and your clients:
- Step 1: Confirm Signed Documents and Project Setup
- Step 2: Run the Kickoff Meeting and Align Scope, Budget, and Schedule
- Step 3: Set Communication Rules and Client Portal Access From Day 1
- Step 4: Use the First Week to Verify Setup and Keep Onboarding Active
- Conclusion: The Key Parts of a Strong Construction Client Onboarding Process
- FAQs
“So wait — who do I email about this?”
“Uhm… is the deposit due before or after the permit?”
“And by the way, where do I check on progress?”
“Also, quick heads up — I’ll be in Mongolia for two weeks, won’t go online. You’ve got everything you need from me, yeah?”
These questions are manageable coming from one client. But it becomes a cause for migraines (and possible disaster) when you’re juggling five projects at a time, with clients who always consider their request urgent. Not only that — it has real financial consequences on you, too.
67% of service firms say delayed intake is a main cause of project delays. And poor early client setup can cost firms 10% to 20% of new clients in the first 90 days.
The fix?
Onboard your clients properly into your construction software.
A clear handoff is what prevents that scramble — and you should do it before the first shovel hits dirt.
The challenge is that this step seems so “unnecessary” that you might feel ashamed to “waste their time” on it.
Here are the steps to make onboarding efficient (and easy) for you and your clients:
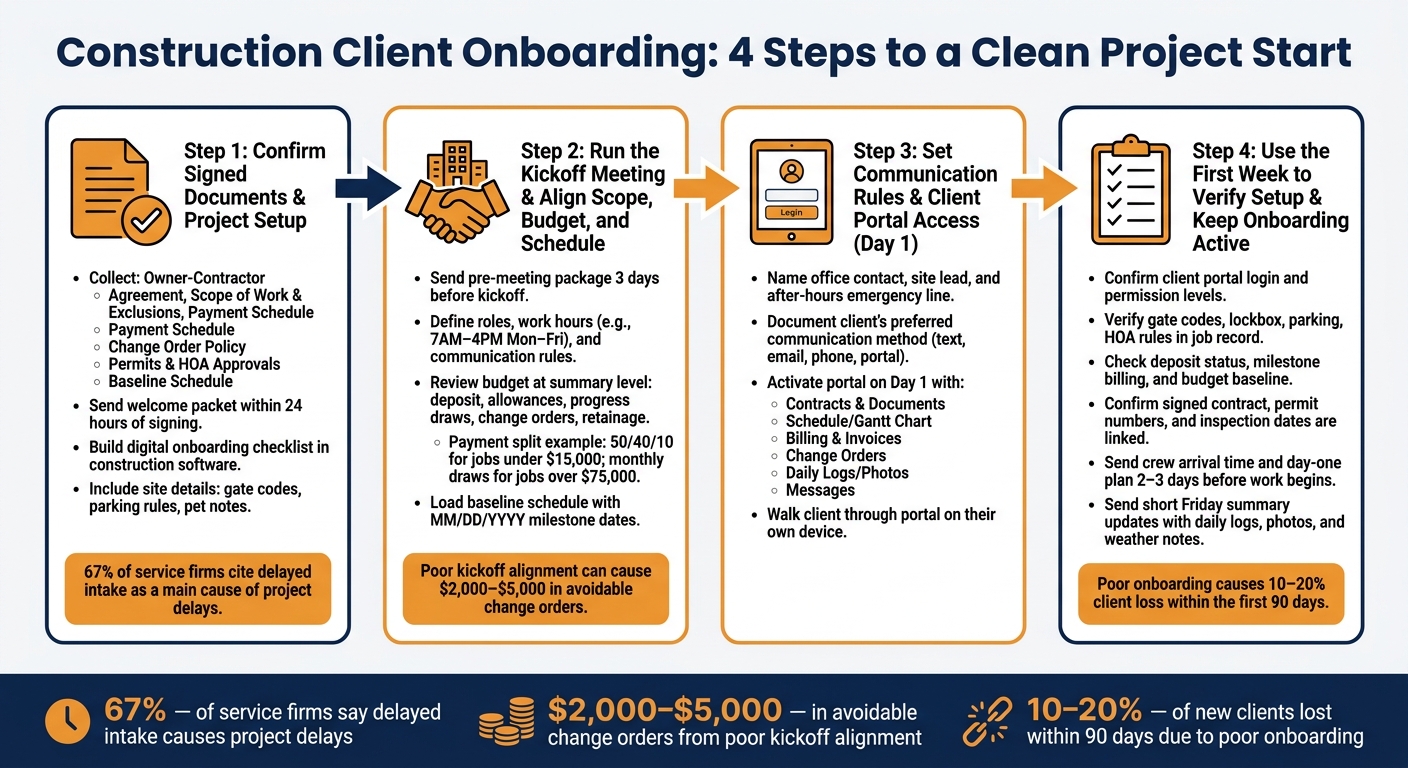
Construction Client Onboarding Process: 4 Steps to a Clean Project Start
Step 1: Confirm Signed Documents and Project Setup
Before a crew ever pulls up to the site, the signed deal needs to become a checked, active job record in your system. That handoff matters. It’s the moment onboarding stops being paperwork and starts becoming project setup.
Collect the Core Signed Documents Before Kickoff
Before the start date, make sure the main documents are signed, checked, and easy to find.
Start with the owner-contractor agreement. Confirm the signature, the date, and the deposit.
Then review the signed scope of work and keep a separate exclusions list for items like permits, landscaping repair, and engineering. That extra step can save a lot of back-and-forth later.
Also confirm that the payment schedule and change-order policy are signed. The change-order policy should plainly state that work stops until the change order is signed. Set proposal expiration dates at 30 days to reduce pricing and scheduling risk.
You should also track permits, insurance, HOA approvals, and local municipal requirements before work begins.
| Document | Key Verification Step |
|---|---|
| Owner-Contractor Agreement | Confirm signature, date, and deposit |
| Scope of Work & Exclusions | Line-by-line review before kickoff |
| Payment Schedule | Confirm milestone dates match contract |
| Change Order Policy | Confirm client understands work stops until signed |
| Permits & HOA Approvals | Document permit numbers and inspection schedule |
| Baseline Schedule | Share at least one week before start date |
Build a Digital Onboarding Checklist in Construction Software
Use construction software to assign each task, add due dates, and mark items complete only after the file is uploaded and checked. Contractor Foreman helps with built-in document management, custom fields, and a directory that tracks contacts, insurance expiration dates, and certifications, all tied to the right project.
The checklist should also include the small site details crews need on day one:
- Gate codes
- Lockbox locations
- Parking rules
- Pet notes
- Neighbor issues
These details can sound minor, but they become a problem fast when a crew can’t get into the job site. Research on service firms found that 67% point to delayed intake as a main cause of project delays.
A digital onboarding process keeps contract data, files, and project details inside one job record.
Within 24 hours of signature, send a welcome packet with the project summary, key contacts, and portal link. Once that packet is out, the kickoff meeting can lock in the scope, budget, and schedule.
sbb-itb-5eea312
Step 2: Run the Kickoff Meeting and Align Scope, Budget, and Schedule
Using the job record from Step 1, the kickoff meeting turns paperwork into a live project plan. If this step goes sideways, scope confusion can lead to $2,000 to $5,000 in avoidable change orders.
Set the Kickoff Agenda and Define Project Roles
Send the client a pre-meeting package 3 days before the kickoff. It should include the proposed agenda, a high-level project timeline, and a site prep checklist.
During the meeting, walk through the basics first: who’s who, who handles what, and how the job will run day to day.
Then get specific about site access, neighbor limits, work hours, cleanup rules, scope confirmation, exclusions, and what happens when problems come up.
Set working hours in plain terms – for example, 7:00 AM to 4:00 PM, Monday through Friday – and define what “clean” means at the end of the day, such as broom-swept floors and debris removed.
That sounds small, but it saves a lot of back-and-forth later. Do the same for communication: explain how emergency issues will be handled and how routine questions should be sent. Record every decision in your construction software during the meeting or right after it so the system stays the single source of truth.
Review Budget Details in Dollars and Explain Payment Timing
Once roles and scope are clear, go over the budget.
Keep it at the summary level.
Show section totals instead of a full line-item dump. Explain allowances as set dollar amounts, and make sure the client knows how overages and credits will work. Point out exclusions too, so there’s no gray area around what the budget does not cover.
| Budget Item | Where It Appears in Software | When the Client Reviews It |
|---|---|---|
| Deposit | Invoices / Client Portal | At signing, before mobilization |
| Allowances | Estimate / Selections | During kickoff and before material orders |
| Progress Draws | Schedule Milestones / Invoicing | Upon completion of each defined phase |
| Change Orders | Change Order Log / Portal | Immediately when scope deviates from the original contract |
| Retainage | Final Invoice / Financial Summary | At project closeout and final walkthrough |
Every payment should connect to a milestone, not just a date on the calendar.
For example, tie a draw to rough-in completion instead of “the first of the month.” For smaller jobs under $15,000, a 50/40/10 split – deposit, midpoint, and final payment – often works well. For larger projects over $75,000, monthly progress draws can keep cash flow steady. If retainage is part of the deal, spell out that the final 10% is due at punch list completion or the final walkthrough so the client knows exactly what stays open at closeout.
After the budget terms are set, lock in the milestones that drive payment timing.
Set the Baseline Schedule and Client-Facing Milestones
Load the schedule into your software during the kickoff. Break it into phases the client can follow, like demolition, rough-ins, drywall and finishes, and final walkthrough. Then assign a date in MM/DD/YYYY format – such as 08/15/2026 – to each milestone.
Build selection deadlines into the schedule too.
If the client is late picking fixtures or finishes, that can push the finish date, and they need to see that upfront. Mark outside factors that can affect timing, including permit processing, HOA review cycles, and inspection availability. Add buffer time for weather, and list U.S. holidays or client blackout dates as no-work days.
Before the meeting ends, have the client log into the portal on their own device and verify that they can see the live schedule and milestones.
With scope, budget, and dates in place, the next step is setting communication rules and portal access.
Step 3: Set Communication Rules and Client Portal Access From Day 1
Once the kickoff locks in scope, budget, and schedule, the next job is simple: give the client a clear way to communicate and a clear place to find project info. That’s what keeps work moving instead of getting stuck in back-and-forth.
Create a Written Communication Plan
Put the communication plan in writing on day one. Name the office contact, site lead, and after-hours emergency line. Also spell out who the client’s approved decision-makers are, so mixed directions don’t slow the job down. The roles, milestones, and payment terms confirmed at kickoff should guide who communicates what.
Set expectations early for weekly progress updates, milestone photos, and monthly billing updates on larger jobs. Then confirm how the client wants to hear from you – text, email, phone, or portal message – and document that choice. For change orders, be direct from the start: stop work on changed items until the client signs the change order.
Set Up the Client Portal and Walk the Client Through It
Turn on portal access on day one. Before the walkthrough, upload the signed contract, scope documents, and baseline schedule so the client can see current project details right away. Use the same job record from setup to keep the portal up to date.
During the walkthrough, show the client exactly where to find contracts, schedules, invoices, daily logs, and messages . Contractor Foreman keeps contracts, schedules, invoices, daily logs, and messages in one web and mobile portal, with QuickBooks sync for billing.
Use this portal map during the walkthrough:
| Portal Section | Common Client Question Answered |
|---|---|
| Contracts & Documents | What exactly did I approve and sign? |
| Schedule / Gantt Chart | What is happening next and when will the project be done? |
| Billing & Invoices | How much has been billed so far and when is the next payment due? |
| Change Orders | What additional work was approved and how does it affect the price? |
| Daily Logs / Photos | What progress was made on-site today? |
| Messages / Comments | Who did I talk to about this specific change? |
When the client knows where updates live and who to contact, the first week turns into a check on setup – not a scramble for answers.
Step 4: Use the First Week to Verify Setup and Keep Onboarding Active
After kickoff and portal access, the first week should be used to make sure the setup works in day-to-day use. Onboarding doesn’t stop after the kickoff meeting or portal walkthrough. This is the window to catch setup mistakes before they spill into the project.
Small issues can snowball fast. A wrong email, a broken link, or a failed login might seem minor at first, but they can slow communication and frustrate the client. Fixing them early keeps the experience orderly and helps build trust before the main work starts.
Verify Logins, Data Accuracy, and First-Week Checklists
Start by confirming the client can log in, the contract and scope are tied to the correct project, and the budget, milestones, and client-dependent dates match the signed agreement. After login, confirm the contract and scope are linked to the right project, check that the baseline budget and payment milestones match the signed agreement, and mark client-dependent dates clearly in the portal.
Also make sure all access notes are up to date in the job record.
| Verification Category | What to Check | Where in the Software |
|---|---|---|
| Access | Portal login confirmed, permission levels set, branding/logo visible | Client Portal / Settings |
| Logistics | Gate codes, lockbox codes, parking restrictions, pet instructions, HOA rules | Project Details / Directory |
| Financials | Deposit status, milestone billing setup, budget baseline | Invoicing / Financial Tab |
| Documentation | Signed contract linked, permit numbers, HOA approvals | Files & Photos / Permits |
| Schedule | Start and end dates, selection deadlines, inspection dates | Gantt Chart / Schedule |
| Activity | Daily progress photos, weather logs, material receipts | Daily Logs |
Once the records are right, keep the client in the loop with short early progress notes.
Send Early Updates and Document Site Activity Clearly
After access and project data are checked, move into brief, regular updates. Two to three days before work begins, send the client a short confirmation message with the crew arrival time, parking plan, and what to expect on day one. That cuts down confusion and shows the project is being managed closely.
Use daily logs to track completed work, next steps, and any cost or schedule impact – including materials received, equipment used, labor hours, and weather conditions – and send a short Friday summary to keep the client current. Keep these updates brief and plain so the client never has to guess what’s going on.
Conclusion: The Key Parts of a Strong Construction Client Onboarding Process
Strong onboarding starts the moment the contract is signed. The steps in this guide help turn that signed agreement into a project that’s ready to run, with a clear starting point for the crew, subcontractors, and the client before any jobsite work begins.
The risk of a weak start is bigger than a lot of contractors think. Research shows professional services firms lose 10% to 20% of new clients within the first 90 days, and poor onboarding is named as the main reason. A set process, backed by Contractor Foreman, gives contractors one place to manage documents, schedules, and communication from day one.
That kind of structure helps cut down on disputes, keeps clients in the loop, and makes tough talks about delays, change orders, and costs much easier to manage. From signed paperwork to first-week check-ins, each step helps protect the project before the work even starts.
FAQs
What should I automate first in construction client onboarding?
Start with the admin work that kicks in as soon as a project is marked as won. That usually includes:
- welcome emails or other kickoff messages
- signed legal or compliance paperwork
- client portal access
These are often the best tasks to automate first. Why? Because they cut down on manual data entry, keep project details in one place, and give clients a clear, professional start from day one.
How do I handle a client who delays approvals or selections?
Set clear expectations during onboarding: if approvals or product selections come in late, the project timeline can slip and costs can go up.
Use the Contractor Foreman client portal to keep requests in one place, collect electronic signatures, send updates on time, and keep a documented audit trail. That cuts admin back-and-forth, improves transparency, and gives clients what they need to make decisions faster.
What should be included in a client portal on day one?
From day one, the client portal should be the main hub for clarity and expectations.
It should give clients one place to see the project scope, timeline, major milestones, payment schedule, and key files like signed contracts, permits, and blueprints.
It should also include:
- Team contact information
- Clear communication protocols
- E-signature tools for approvals, change orders, selections, and invoices
When all of that lives in one spot, clients don’t have to dig through emails or wonder what happens next. They can log in, check the plan, review documents, and keep things moving without the usual back-and-forth.