
We’ve all learned one rule about projects: nothing ever goes exactly as planned.
Whether you’re building a physics diorama or a skyscraper, things can—and likely will—go wrong. If you didn’t stash a little extra cash, you’re in deep trouble.
That’s why budget contingency is a must. Even a small cushion can mean the difference between finishing on time and watching your project—and your relationships, reputation, and sanity—fall apart.
We all know this—especially in construction, where one small error can make everything go completely sideways.
But sometimes, in our eagerness to win a bid, we quote so low that there’s almost nothing left for the unexpected. Suddenly, it feels like nothing could possibly go wrong… until it does.
If you’re in construction, budget contingency isn’t optional. It helps you prepare for the risks that will inevitably appear, from design errors to material price changes to weather delays.
Recognizing the need is easy, but the tricky part is figuring out exactly how much contingency you need.
Here’s how to calculate construction budget contingency effectively:
- Break the Project into Phases: Divide your project into stages (e.g., design, procurement, construction) and assess risks for each phase.
- Estimate Base Costs: Use detailed estimates and tools to calculate accurate building construction cost estimates for each phase.
- Apply Contingency Percentages: Assign percentages based on risk levels. For example, new construction may need 3–5%, while renovations could require up to 25%.
- Sum Up Contingencies: Add the contingency amounts for all phases to determine the total reserve.
- Track and Adjust Usage: Monitor how funds are used and adjust as risks are resolved.
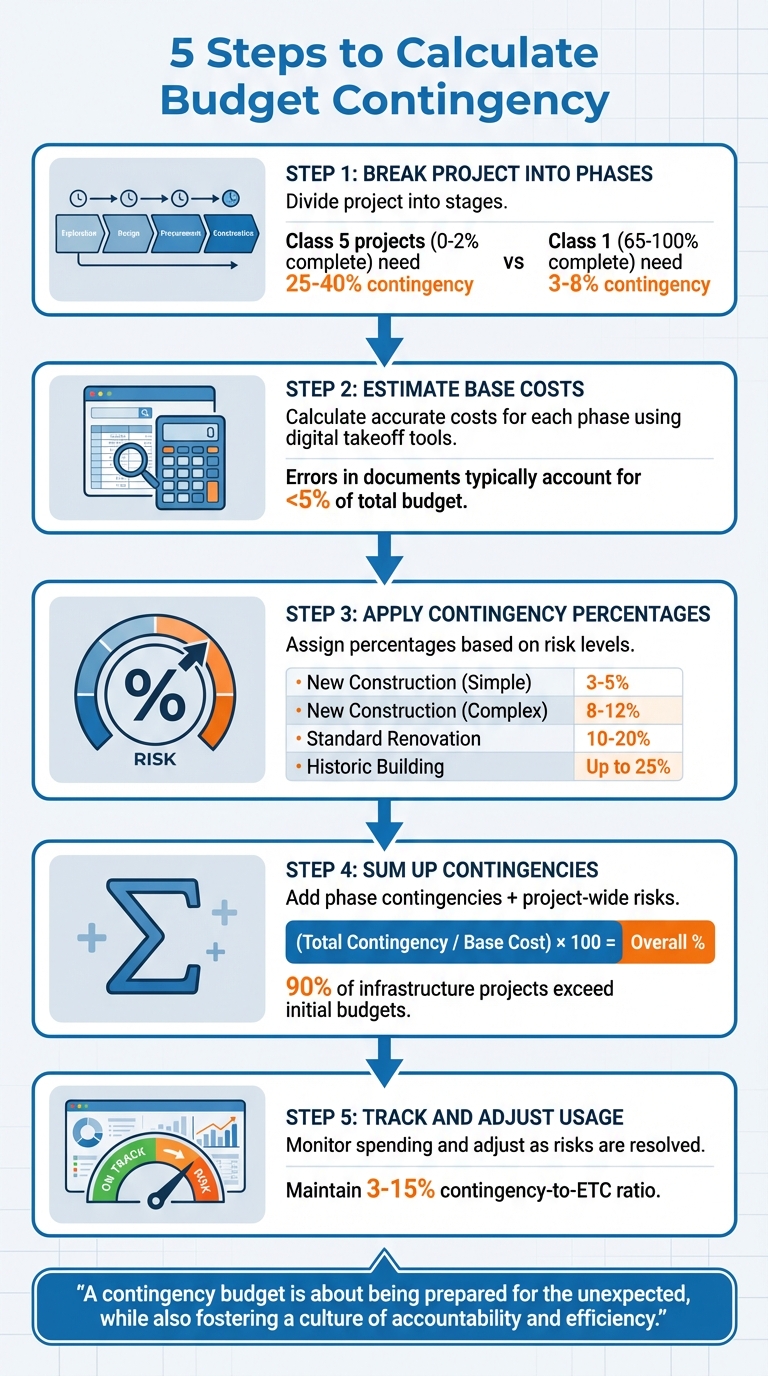
5-Step Process for Calculating Project Budget Contingency
Step 1: Identify Project Phases and Risks
Divide Your Project into Phases
Breaking your project into phases allows for more precise contingency planning. According to the Association for the Advancement of Cost Engineering (AACE), projects are categorized into five classes based on their level of definition.
Class 5 represents 0% to 2% completion, while Class 1 represents 65% to 100% completion.
In real-world applications, contractors usually divide projects into four stages: Exploration/Feasibility, Design, Procurement/Bidding, and Construction/Execution. This approach helps align the uncertainty of risks with the appropriate contingency needs.
Each phase comes with its own level of uncertainty, requiring tailored contingency percentages. For instance, a project that is only 10% designed might need a contingency of 25% to 40%. In contrast, a fully defined project typically requires a contingency of just 3% to 8%. Once the phases are outlined, the next step is to evaluate the specific risks associated with each stage.
Evaluate Risks in Each Phase
After dividing your project into phases, identify risks that could increase costs at each stage.
For the Design phase, risks might include an unclear scope, errors or omissions in construction documents, or adjustments to mechanical or structural layouts.
During the Procurement phase, cost fluctuations become a major concern – prices for materials like steel and concrete can vary significantly between the estimation and purchase stages.
The Construction phase brings its own challenges, such as unforeseen underground conditions, weather-related delays, or changes in sequencing. Renovation projects, in particular, are prone to higher risks due to hidden issues in older buildings, often requiring contingencies as high as 25%.
For projects involving multiple disciplines, assess the maturity and cost quality of each line item individually. Then calculate a weighted average to determine the overall contingency allowance. To maintain transparency, assign a unique cost code for contingencies in your budget. As the project progresses and risks are addressed, update your base estimate and contingency allowances every three months.
sbb-itb-5eea312
Step 2: Calculate Base Costs for Each Phase
Create Detailed Cost Estimates
Getting your base costs right is crucial – it’s the backbone of any reliable contingency plan. Your project budget includes both direct construction costs and a reserve for potential risks.
To nail down accurate estimates, you’ll need to connect digital quantity takeoffs (like lengths, areas, and counts) with real-world labor, material, and equipment rates stored in centralized cost catalogs. This method replaces guesswork with actual pricing data. Still, as David H. Hart, FAIA of MOCA Systems, puts it, cost estimating is “more of an art than a science”, so getting input from cost experts during the programming and design stages is a smart move.
The precision of your estimate hinges on two factors: how well-defined your project scope is and the quality of your reference data and historical records. To keep things organized, you can assign a “Confidence Grade” (A through X) to each line item, helping you pinpoint areas that might need larger contingency buffers. Interestingly, errors and omissions in construction documents usually account for less than 5% of a project’s total budget.
This is where digital tools can make a big difference.
Use Cost Estimation Tools
Switching from scattered spreadsheets to a structured digital system can bring consistency to your pricing and cut down on manual mistakes. Digital takeoff tools allow you to extract quantities directly from drawings using on-screen measurement features, making it easier to update estimates as designs change.
Cloud-based construction estimating tools, which generally cost between $40 and $250 per month, are widely available and cater to contractors of all sizes. For instance, Contractor Foreman (https://contractorforeman.com) offers built-in estimating tools as part of a larger project management platform. With a 4.6/5 rating on Capterra, it also includes financial and document management features, letting you seamlessly transfer estimates into active project budgets without re-entering data.
Step 3: Apply Contingency Percentages by Phase
Once you’ve nailed down your base costs and identified potential risks, it’s time to calculate contingency amounts. This step ensures you’re setting aside funds for unexpected challenges, adding a layer of financial security to your project.
Set Risk-Based Percentages
Start by assigning contingency percentages that match the risk level of each project phase. The golden rule here is simple: the less defined the project scope, the higher the contingency percentage you’ll need.
For straightforward new construction projects, like a basic warehouse, a 3–5% contingency is typically sufficient. On the other hand, complex builds with intricate designs or coordination challenges might require 8–12%. Renovations are a different ballgame altogether. A standard renovation might need a 10–20% contingency, but older buildings with structural uncertainties could demand up to 25%.
Contingencies can also be broken into categories:
- Design Contingency: Covers changes in architectural plans or coordination issues, often falling in the 5–10% range of total construction costs.
- Construction Contingency: Accounts for on-site surprises like weather problems or soil issues, also typically around 5–10%.
For example, the Utah State Capitol restoration project used a structured 6% owner’s contingency that factored in multiple risk elements. This layered approach can guide your own contingency planning.
Calculate Contingency for Each Phase
Here’s the formula to calculate contingency:
Contingency = Base Cost × Percentage
Let’s say the foundation phase of your project costs $150,000, and you’ve assigned a 10% contingency to cover potential soil issues. That means you should reserve $15,000 for this phase.
For larger-scale projects exceeding $15 million, consider a probabilistic approach using the Expected Monetary Value (EMV):
EMV = Probability of Risk Occurring (%) × Impact Cost ($)
For instance, if there’s a 30% chance of dealing with contaminated soil that could cost $50,000 to remediate, the EMV-based contingency for this risk would be $15,000.
Create a Comparison Table
A table can help visualize how risk levels translate into dollar amounts across different project phases:
| Project Type/Phase | Risk Level | Contingency % | Example: $100,000 Base Cost |
|---|---|---|---|
| New Construction (Warehouse) | Low | 3–5% | $3,000 – $5,000 |
| New Construction (Complex) | High | 8–12% | $8,000 – $12,000 |
| Standard Renovation | Moderate | 10–20% | $10,000 – $20,000 |
| Historic Building Renovation | Very High | Up to 25% | Up to $25,000 |
| Public Works | Standardized | 5–10% | $5,000 – $10,000 |
As your project progresses, revisit these percentages at key milestones. For example, after completing high-risk tasks like roofing or concrete work, you can safely reduce weather-related contingencies. This ongoing adjustment keeps your contingency plan aligned with the project’s evolving needs.
Step 4: Add Up Phase Contingencies
Total Your Contingencies
Once you’ve assigned contingencies to each phase, the next step is to combine them into a single reserve for the entire project. Add up the contingencies for all phases to get the total amount.
For instance, if you’ve set aside $15,000 for foundation work, $8,000 for framing, and $12,000 for finishing, your total contingency reserve would come to $35,000. To keep things organized, assign a dedicated cost code for the reserve using construction management software. This makes it easier to track how the reserve is being used when unexpected costs arise.
Calculate the Overall Percentage
Now, figure out what percentage of your total project budget is represented by the contingency reserve.
Use this formula: (Total Contingency Amount / Total Project Base Cost) × 100.
For example, if your project’s base cost is $500,000 and your total contingency reserve is $40,000, the calculation ($40,000 ÷ $500,000) × 100 gives you an 8% contingency. A real-world example of this can be seen in the Utah State Capitol restoration project, where a 6% contingency was set by combining 3% for program and design changes, 2% for unknown site conditions, and 1% for political factors. Once you’ve done this, shift your focus to risks that impact the entire project.
Include Project-Wide Risks
In addition to phase-specific risks, you need to plan for uncertainties that could affect the entire project.
While individual contingencies handle risks within specific stages, broader risks – like market fluctuations, sudden material price spikes, supply chain issues, or regulatory changes – require their own buffer. Adjust this buffer based on current market conditions, especially considering that 90% of infrastructure projects exceed their initial budgets, with road projects alone averaging a 20% cost increase.
By accounting for these wider risks, you can better prepare for unexpected challenges.
Step 5: Add Contingency to Budget and Track Usage
Once you’ve calculated your phase contingencies, the next step is to integrate them into your overall project budget and keep a close eye on how they’re used.
Complete Your Project Budget
To finalize your project budget, combine the contingency reserve with your base cost. For instance, if your base cost is $500,000 and your contingency reserve is $40,000, your total project budget would be $540,000. If you’re managing both owner and contractor contingencies, make sure to keep these separate. They serve different purposes, follow distinct approval processes, and address varying risks.
Monitor and Adjust Contingency
Tracking how your contingency funds are used is just as critical as planning for them.
Each time contingency funds are utilized, document the withdrawal with a brief explanation and link it to the relevant change order. A Proposed Change Order (PCO) log can help you record every requested change before it becomes official, ensuring that all associated purchase orders, invoices, and change orders are tied back to your contingency cost code.
To streamline this process, consider using construction management software like Contractor Foreman. Tools like these provide real-time dashboards that show your remaining contingency balance and automatically link expenses to the appropriate cost code. This eliminates the need for outdated spreadsheets and gives you a clearer view of your project’s financial standing.
As your project moves forward, compare your remaining contingency funds to the risks still ahead. A well-managed project typically maintains a contingency-to-ETC (Estimate-to-Complete) ratio between 3% and 15%. For example, once high-risk phases like foundation work are completed, you might reassess and release some contingency funds. On the flip side, if your contingency-to-risk exposure ratio dips below 0.75 or exceeds 1.25, adjustments will be necessary.
“A contingency budget is about being prepared for the unexpected, while also fostering a culture of accountability and efficiency.” – Sidharth Ramsinghaney, Director of Strategy and Operations, Twilio
Lastly, establish clear, written procedures that require formal approval before accessing contingency funds. This promotes accountability and ensures funds are used appropriately.
Conclusion
Building a reliable budget contingency isn’t just about setting aside extra funds – it’s about creating a risk-aware financial plan that keeps your project on track and reassures stakeholders.
By breaking the process into five clear steps – dividing the project into phases, calculating base costs, applying risk-based percentages, summing up contingencies, and continuously monitoring usage – you replace guesswork with a structured, defendable approach. These steps form the backbone of effective contingency planning, ensuring your budget can handle the unexpected.
“Stop treating contingency as an optional cushion. Simply, view it as a part of making the budget work.” – Tamara Melkonyan, Author, Buildern
Contingency planning isn’t a one-and-done task. Regular reviews are crucial – whether during monthly cost meetings or as risks evolve over time. Release unused funds when risks are resolved, and adjust allocations as new challenges emerge. Keeping detailed records – photos, field notes, and change orders – ensures transparency and helps avoid “budget creep”, the silent drain on profitability.
This disciplined approach lays the groundwork for integrating software solutions effectively.
How Contractor Foreman Helps
Executing these strategies efficiently requires the right tools. Relying on manual spreadsheets can be tedious and prone to errors.
Contractor Foreman streamlines the process by embedding financial tracking directly into your project management system. With features like dedicated cost codes for contingencies, automated linking of change orders and invoices, and real-time dashboards, you can manage everything seamlessly from your computer or mobile device.
Its financial management tools keep contingency funds clearly separated from other costs like labor and materials, simplifying audits and stakeholder reporting. When field crews report unexpected site conditions through the mobile app, you can instantly evaluate the impact on your contingency reserve and make adjustments. Plus, centralized document storage ensures all supporting materials – photos, notes, and approvals – are organized and accessible, eliminating the need to piece together past decisions.
Whether you’re overseeing a $50,000 remodel or a $5 million commercial project, having the right tools can mean the difference between scrambling to fix issues and maintaining proactive control.
FAQs
What costs should contingency cover (and not cover)?
Contingency funds are meant to handle unexpected costs and risks that arise during construction. These might include surprises like unforeseen site conditions, design adjustments, weather-related delays, or additional material requirements. Essentially, it’s there to address the “known-unknowns” – situations where uncertainties can be anticipated but not accurately predicted.
However, contingency funds should not be used to cover planning mistakes, avoidable changes to the project scope, or predictable expenses already accounted for in the original budget. Its purpose is to manage unplanned events, not errors or foreseeable issues.
How do I choose the right contingency percent for my project?
Choosing the right contingency percentage hinges on factors like your project’s complexity, the level of risk involved, and current market conditions. Typically, most projects set aside 5-15% of the total budget. For standard projects, a 5-10% range is common. However, if your project carries higher risks or uncertainties, you might need to allocate 10-15% or even up to 20%. Carefully assess the specific risks and unknowns tied to your project to decide on the most suitable percentage.
When should I reduce or release unused contingency?
When monitoring reveals that allocated contingency funds are no longer required for unexpected issues, it’s wise to reduce or release them. After evaluating actual contingency spending, any surplus funds can be redirected to other areas. Keeping contingency separate from the project schedule and tracking its use in real-time makes it easier to decide when to confidently release unused funds.