
You’ve been examining a blurry photo for almost an hour now.
You squint.
Zoom in, zoom out…
then zoom in again.
Beads of sweat roll down your neck as you slowly accept that it’s hopeless. You blame yourself—if only you’d checked the photos the same day. If only you’d remembered that José’s photo-taking skills are roughly on par with a three-year-old holding an iPad for the first time.
The photo was supposed to prove the roof flashing was installed correctly before the roof was closed, but all you see is José’s thumb, a glare, and what might be flashing. If only you’d been more meticulous six months ago, you wouldn’t be dealing with this kind of mess now.
Now, the work is being questioned. Payment is on hold. And tearing the roof back open is suddenly on the table (costing you possibly $20,000, $30,000, maybe more!)
One clear, time-stamped photo would have ended the argument fast. But oh well…
Construction photo documentation exists for moments like this.
It’s an essential tool for tracking milestones and—more importantly—resolving disputes in construction projects. By using time-stamped images, you can visually document project progress, ensure compliance, and provide evidence for claims or inspections.
What proper photo documentation gives you:
- Tracks Progress: Visual timelines help monitor milestones, confirm task completion, and simplify updates for stakeholders.
- Protects Legally: Time-stamped photos provide proof of site conditions, safety measures, and compliance, shielding against false claims.
- Improves Efficiency: Organized photo records reduce unnecessary site visits and rework while speeding up decision-making.
- Supports Dispute Resolution: Clear images of installations, site conditions, and weather events help settle disagreements quickly and fairly.
To get the most out of photo documentation, focus on preconstruction site conditions, milestone progress, and critical installations before they’re hidden.
Use standardized processes, structured organization, and tools like Contractor Foreman to streamline photo management and integrate it with your project workflows. This approach not only saves time but also builds trust with clients and ensures smoother project execution.
Types of Construction Photos to Capture
Understanding what photos to take is just as important as knowing why you’re taking them. A well-thought-out photo documentation strategy should cover three main categories, aligned with your project phases: preconstruction site conditions, progress photos at key milestones, and critical installations and concealed work. Each category creates a visual record that helps protect your project and supports its progress.
These categories tie back to the earlier-discussed benefits by providing targeted, phase-specific documentation.
Preconstruction Site Conditions
Before any work begins, take photos to document the baseline condition of the site. Start with wide-angle shots from multiple perspectives, including elevated views where it’s safe, to capture the overall layout. These images should highlight boundaries, neighboring properties, and access routes, offering a clear overview of the site.
Focus on key features such as buildings, sidewalks, fences, and landscaping. Include visible utilities like manholes, fire hydrants, power lines, utility boxes, and 811 locates. Don’t forget to photograph adjacent properties and public areas to safeguard against claims of pre-existing damage caused by your work.
Pay close attention to topography and drainage patterns. Capture images of standing water, erosion, slopes, and any environmental constraints like wetlands, protected areas, or trees marked for preservation. Including street signs, lot numbers, or excerpts from site plans in your photos can make it easier to identify locations and connect images to project drawings later.
These baseline images lay the groundwork for tracking progress and protecting your work.
Progress Photos at Project Milestones
Progress photos document the evolution of your project, creating a visual timeline that tracks progress and ensures accountability. Capture images regularly – whether daily or during each site visit – and at key milestones that represent shifts in scope or risk. Common milestones include excavation, footings, framing, MEP rough-ins, envelope work, interior finishes, and substantial completion.
At each milestone, take consistent overview shots from the same angles and, if possible, at the same time of day. Complement these with detailed images of specific areas. Use identifiable reference points like gridlines, columns, or building corners to help viewers orient themselves without needing to visit the site. Also, include contextual details such as workers, equipment, materials, and weather conditions to provide a complete picture of the progress.
This step naturally transitions into documenting work that will soon be hidden from view.
Critical Installations and Concealed Work
Before any work is concealed, it’s essential to document it thoroughly. Prioritize capturing in-wall or in-ceiling MEP rough-ins, such as plumbing, electrical wiring, low-voltage cabling, HVAC systems, and fire sprinklers. Additionally, document under-slab utilities before concrete is poured, as well as structural elements like rebar layouts, anchor bolts, waterproofing systems, insulation, air/vapor barriers, and specialty systems like radiant heating or utility crossings.
For each installation, take a series of photos: start with a wide shot showing the location in context (relative to gridlines or framing), followed by medium shots of assemblies, and finish with close-ups of connections, fasteners, valves, labels, or test gauges. Including a plan or detail drawing in one of the photos can help verify compliance with project specs and prove invaluable when diagnosing issues like leaks or system failures later.
For instance, on a plumbing project, a subcontractor documented in-wall plumbing by photographing pipe materials, connections, pressure tests, and framing before drywall was installed. When a suspected leak arose later, these photos pinpointed pipe locations and resolved the issue without requiring demolition.
Best Practices for Construction Photo Documentation
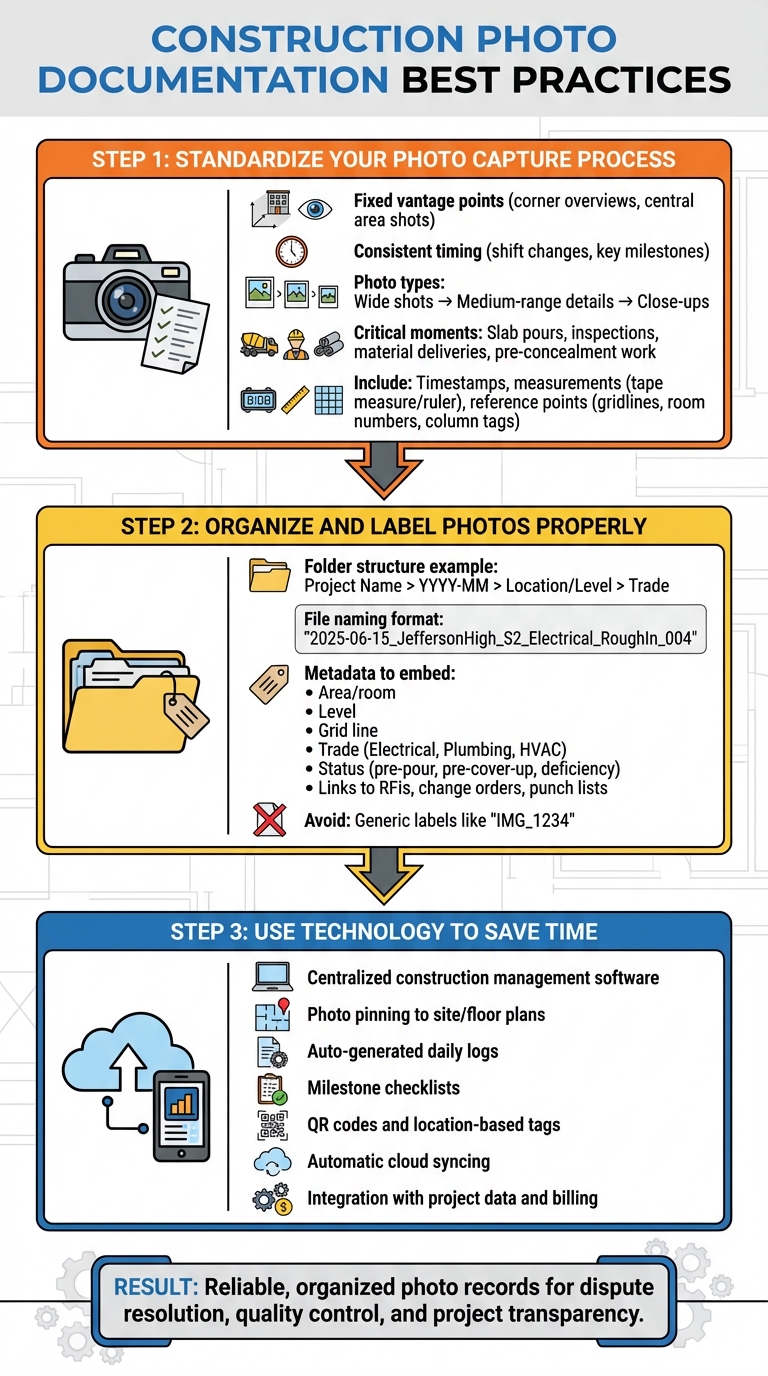
Construction Photo Documentation Best Practices: 3-Step Process
The way you capture and organize photos can make or break your documentation’s value for resolving disputes, maintaining quality, and ensuring project transparency. Following these practices will help you create photo records that are reliable and easy to act on.
Standardize Your Photo Capture Process
Consistency is everything. Set up a clear photo standard operating procedure (SOP) for your team to follow on every project. This should include fixed vantage points – such as corner overviews and central area shots – taken at consistent times, like shift changes or key milestones. This approach creates a visual timeline, making before-and-after comparisons simple.
Your SOP should outline exactly when photos need to be taken: during milestones like slab pours, inspections, material deliveries, and before any work becomes inaccessible. Capture each activity with a mix of wide shots, medium-range details, and close-ups of critical features such as connections or labels. Use cameras or apps that add local timestamps (like 8:00 AM or 3:30 PM) to verify schedules and strengthen your documentation for any claims.
When measurements matter – like anchor placements, rebar spacing, ADA clearances, or crack widths – include a tape measure, ruler, or calibrated scale in the shot. Align it with the key measurement for accuracy. Adding reference points like gridlines, room numbers, or column tags makes it easier for designers, inspectors, or attorneys to confirm locations without needing to visit the site.
Organize and Label Photos Properly
Even the best photos are useless if you can’t find them later.
Use a structured folder system to keep everything organized (e.g., Project Name > YYYY-MM > Location/Level > Trade). File names should follow a consistent format, such as “2025-06-15_JeffersonHigh_S2_Electrical_RoughIn_004”, to make sorting and retrieval straightforward.
Take it a step further by embedding metadata and tags into each image. Include details like area or room, level, grid line, trade (e.g., Electrical, Plumbing, HVAC), status (pre-pour, pre-cover-up, or deficiency), and links to related items like RFIs, change orders, or punch lists.
Train your team to avoid generic labels like “IMG_1234” and instead use concise, descriptive names.
For instance, on a commercial project, a general contractor faced a claim of water damage due to allegedly faulty roof flashing. Because the team had tagged all roof photos with area details, inspection references, and specific notes, they quickly retrieved a complete photo trail proving the installation was code-compliant. This saved them tens of thousands of dollars in potential backcharges and legal fees.
Use Technology to Save Time
Once you’ve standardized your photo capture and organization, technology can take your documentation to the next level.
Construction management software centralizes photos within the project record, preventing them from being scattered across personal phones or random cloud drives.
Tools like Contractor Foreman let you capture photos directly within their mobile app, automatically logging project details and syncing everything to a central dashboard. This eliminates the hassle of manual uploading, renaming, and sharing while ensuring you have a single source of truth for documentation, billing, and dispute resolution.
Look for software that offers features like photo pinning to site or floor plans, allowing you to drop images directly onto their exact locations. Auto-generated daily logs with predefined photo sections and milestone checklists can also help ensure no critical shots are missed. Additional features such as QR codes, location-based tags, and automatic cloud syncing mean that photos captured in the field are immediately available for progress billing, coordination meetings, or owner updates. When your photos are seamlessly integrated with project data, they become a powerful tool instead of just another task to manage.
Tools and Software for Construction Photo Documentation
Using the right tools can turn photo documentation from a time-consuming task into an efficient process that saves time and protects your business. By combining the right hardware and software, you can simplify documentation and ensure it’s well-organized across all your projects.
Cameras and Mobile Devices
Smartphones and tablets are essential tools for construction photo documentation. Modern devices can capture high-resolution images that are both time-stamped and geotagged – key features for ensuring compliance and resolving disputes. To withstand the tough conditions of construction sites, rugged cases can protect these devices from drops, dust, and moisture, making them reliable even in harsh environments.
For more demanding conditions, dedicated construction cameras can outperform smartphones. Models like the GoPro Hero series and Olympus Tough TG-6 come with IP68 waterproof ratings and wide-angle lenses, making them ideal for tight or challenging spaces. These cameras also excel in low-light settings and offer better stabilization, though they do require manual photo transfers.
Construction Management Software
Contractor Foreman simplifies photo management by centralizing everything in one platform. Instead of dealing with scattered files and manual uploads, this software allows field teams to capture and integrate photos directly into project documentation. Automatic timestamping ensures that every image is properly logged, supporting project scheduling and billing.
The platform features unlimited storage across all projects, so you never have to worry about running out of space or paying extra fees. Integration with tools like QuickBooks and Zapier ensures seamless connections between visual documentation and financial systems. For instance, attaching progress photos to completed tasks can automatically trigger billing milestones, providing clear visual proof for payment applications. At just $49 per month for the Basic plan, it’s an affordable solution for unlimited storage and streamlined documentation.
Cloud Storage and Sharing Tools
Reliable cloud storage is crucial for keeping your photos secure and accessible.
Automatic backups ensure that your images are safe from device damage or theft, and real-time syncing allows project managers and clients to view updates as they happen – no need to wait for end-of-day uploads. Role-based access controls let you manage who can view specific files, ensuring that inspectors see compliance-related images while financial documents remain restricted to office staff.
Top cloud storage solutions also include version history and audit trails, which track who accessed or modified files and when. This level of transparency is especially important during OSHA audits or legal disputes. With Contractor Foreman’s automatic cloud syncing, photos taken in the field are instantly available in project dashboards, daily logs, and client portals – eliminating the need for manual transfers or lengthy email chains.
sbb-itb-5eea312
Legal, Safety, and Compliance Benefits of Photo Documentation
Photo documentation creates a reliable, time-stamped record that helps improve safety, ensures compliance, and safeguards your business. Capturing location-specific images provides undeniable proof that can be crucial during disputes, claims, or inspections.
Meeting OSHA and Code Compliance Requirements
Construction photo documentation offers clear evidence that safety measures – like guardrails, fall protection, trench shoring, and housekeeping standards – were in place when work occurred.
When OSHA inspectors or insurance auditors visit your site, dated images of compliant conditions on specific days or shifts can demonstrate adherence to required safety procedures, even if the site has since changed. Documenting toolbox talks, safety signage, inspections, and personal protective equipment (PPE) creates a visual record that supports safety logs and helps defend against potential penalties.
For building code compliance, photos taken before work is covered up can capture critical details such as clearances, fastening patterns, sealants, firestopping, and routing. Systematically photographing stages like rough-ins, insulation, vapor barriers, and fire-rated assemblies allows contractors to show that installations followed approved designs and manufacturer guidelines – even after finishes or drywall are in place. Including a plan or detail callout in the photo, along with a tape measure or level, helps officials and owners verify compliance remotely. This can reduce the need for reinspection trips and provide solid evidence in the event of defect claims. Such thorough documentation lays the groundwork for resolving disputes with clear, indisputable records.
Resolving Disputes and Claims
Wide, medium, and close-up shots can clearly show site conditions and work quality, which are essential for evaluating claims.
Capturing details like weather conditions, nearby properties, and pre-existing damage can be critical when disputes arise, such as allegations that construction activities caused cracks, flooding, or delays.
Insurers rely heavily on visual evidence to determine the cause, extent, and timing of damage. A well-documented photo history offers unbiased proof of site conditions before and after an event.
For example, photographing material storage, temporary weather protection, and site drainage before a storm can demonstrate that reasonable precautions were taken – helping secure insurance coverage and limit liability. Sequential photos showing progress, equipment use, and weather conditions can also support delay claims or justify time extensions by directly linking impacts to work activities. When combined with daily reports and schedules, these photo records often result in more favorable claim resolutions.
Consider another scenario where an owner files a water intrusion claim months after drywall installation, blaming faulty construction. By documenting in-wall plumbing and waterproofing – complete with pressure tests and proper flashing at windows – using time-stamped photos tied to daily logs, contractors can prove that installations met manufacturer standards on specific dates. The photos might also reveal damage caused later by another trade, shifting responsibility. With clear visual evidence, an insurer may agree to cover the damage, resolving the dispute without litigation and avoiding costly legal delays.
These detailed records not only help resolve conflicts but also strengthen overall project accountability.
Improving Accountability and Safety
Consistent photo documentation allows safety managers to quickly spot hazards – like missing guardrails, poor housekeeping, or blocked exits – and address them before incidents occur. Capturing pre-task planning boards, job hazard analyses, and safety signage at entrances shows that risks were communicated and appropriate controls identified.
During high-risk activities – such as crane lifts, hot work, or confined space entries – photos can document barriers, fire watches, spotters, and emergency equipment to confirm that safety measures are actively enforced, not just recorded. Reviewing recurring photo trends across projects can highlight patterns, like inconsistent PPE use among certain trades, prompting targeted training or procedural changes. Additionally, anonymized photos from past incidents or near-misses can be used in toolbox talks and new-hire orientations, providing real-world examples of hazards and effective controls. Over time, this visual feedback loop promotes a culture of accountability and continuous improvement in safety practices.
Using centralized software like Contractor Foreman to link photos with daily logs and safety reports can simplify audits and dispute resolutions. This platform integrates daily logs, safety forms, project management, and photo storage, enabling teams to capture images in the field with mobile devices and automatically tag them to specific projects, dates, and activities. Such systems also make it easy to share curated photo sets with OSHA inspectors, code officials, owners, or insurers, ensuring transparency while maintaining a clear record of who captured what and when.
Conclusion
Using photo documentation effectively in construction projects can streamline management, safeguard your business, and enhance client relationships.
A well-organized system transforms random snapshots into a reliable, time-stamped record that tracks progress, ensures compliance, and helps settle disputes – often eliminating the need for additional site visits. By standardizing what you capture, categorizing images by date and location, and establishing a centralized repository, you can save time and reduce risks at every stage of the project.
The move away from random phone pictures to integrated digital workflows has become essential for contractors aiming to remain competitive and transparent. Tools like Contractor Foreman make this shift easier by seamlessly combining photo capture with other project management features like daily logs, scheduling, and client portals. Field teams can quickly take photos on-site, which are automatically timestamped, sorted by project, and shared instantly with stakeholders like owners, inspectors, or insurers.
Beyond operational efficiency, photo documentation offers legal protection and builds trust with clients. Owners can see real-time updates on quality and progress, easing concerns and boosting confidence in your work. When paired with consistent communication and easy access to records, this transparency strengthens your reputation and distinguishes you in a competitive industry.
To maximize these benefits, define clear categories for documentation – such as preconstruction conditions, critical installations, weather events, and safety setups – and make it a mandatory part of your workflow. By combining these practices with reliable tools, you’ll transform every photo into a strategic asset, improving project outcomes and resolving issues faster.
FAQs
How does photo documentation benefit contractors in legal disputes?
Photo documentation acts as solid, timestamped proof to back up your side of the story in a legal dispute. It can confirm project milestones, show adherence to contract requirements, and highlight the quality of the work delivered.
By offering visual evidence of site conditions, completed work, or delays due to unexpected challenges, photo documentation helps minimize the chances of disputes or false claims. It’s a powerful way to safeguard your business and promote fair resolutions in legal situations.
What photos should be taken during each phase of a construction project?
Capturing photos during every stage of a construction project is crucial for maintaining clear documentation and ensuring accountability. Here are the key phases to focus on:
- Pre-construction: Document the site’s initial condition, any existing structures, and early planning details.
- Foundation: Capture the excavation process, formwork setup, and reinforcement progress.
- Framing: Photograph the installation of the structural framework, including walls and roofing.
- MEP (Mechanical, Electrical, Plumbing): Highlight rough-ins and the installation of critical systems.
- Exterior: Take images of windows, doors, siding, and any landscaping efforts.
- Interior: Record progress on finish work, fixtures, and inspection milestones.
- Final phase: Showcase the completed project, cleanup efforts, and any punch list items.
By consistently photographing each stage, you create a reliable visual timeline that aids in project tracking, simplifies client communication, and serves as a valuable reference for future needs.
How can technology improve photo documentation in construction projects?
Technology has transformed photo documentation, making it quicker, more efficient, and dependable. With digital tools, contractors can snap high-quality images on-site, automatically timestamp them, and store them securely in cloud-based systems. This setup allows instant access to photos while significantly reducing the risk of losing critical records.
Beyond just storage, specialized software can organize and tag photos, making retrieval a breeze. It also simplifies reporting and improves communication with team members and stakeholders. These advancements not only boost project accountability but also help resolve potential disputes and ensure projects stay on track.